
How to Sell ETH (Ethereum) for USDT (Tether) on BitForex
Tue, Apr 20th 2021This article provides a step-by-step tutorial on how to sell ETH (Ethereum) for USDT (Tether) through your BitForex.com Spot Trading Account. This guide is for devices compatible with Windows...

Individuals (7)
How to Sell ETH (Ethereum) for USDT (Tether) on BitForex
Written by Administrator
This article provides a step-by-step tutorial on how to sell ETH (Ethereum) for USDT (Tether) through your BitForex.com Spot Trading Account. This guide is for devices compatible with Windows 10 and newer, and MacOS 10.11 and higher.
Summary
Step 1 - Go to Spot Trading Screen
Step 2 - Open USDT Token Buy/Sell Screen
Step 3 - Sell ETH Token(s)
Step 4 - Confirm Pending/Filled Order
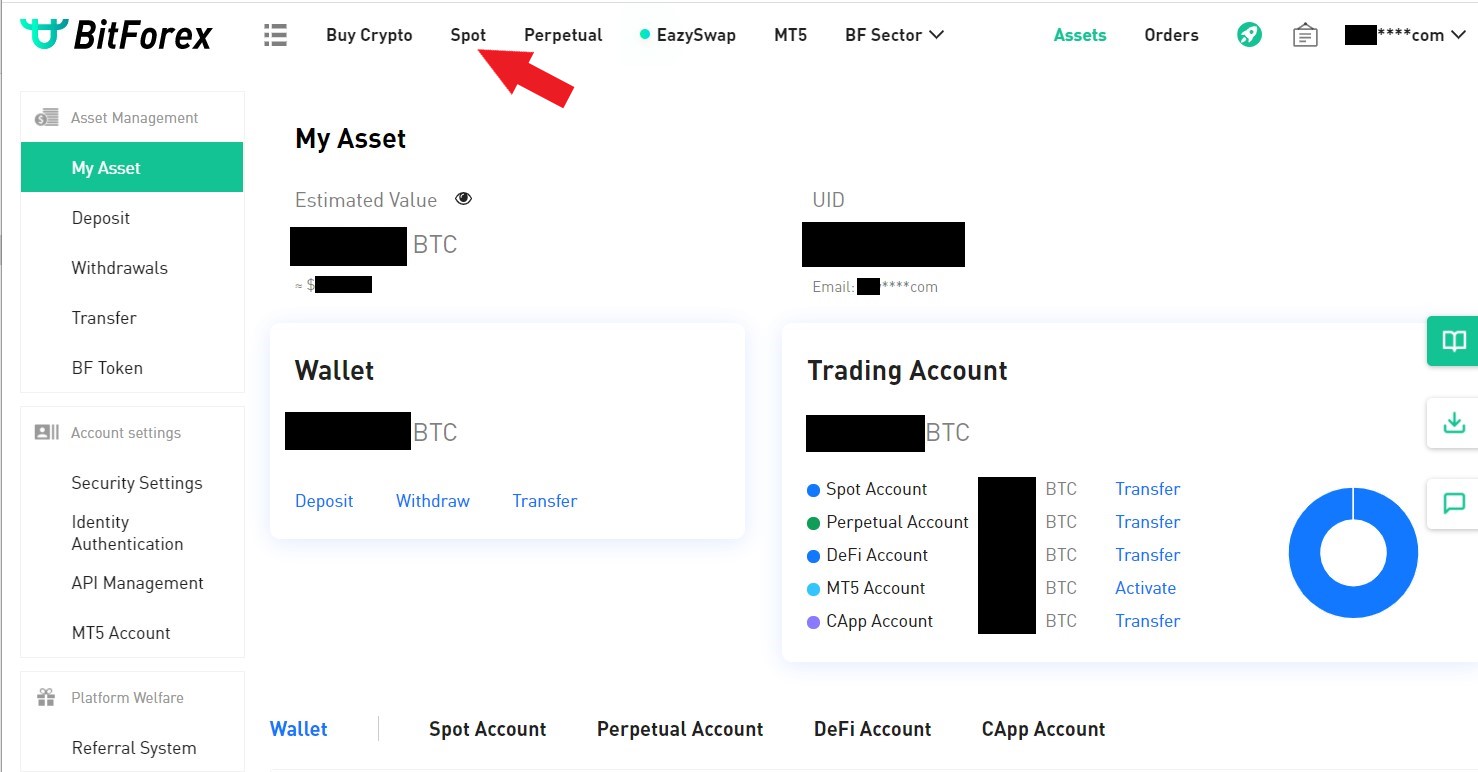
Step 1 - Go to Spot Trading Screen
a) From the Home screen, click on Spot
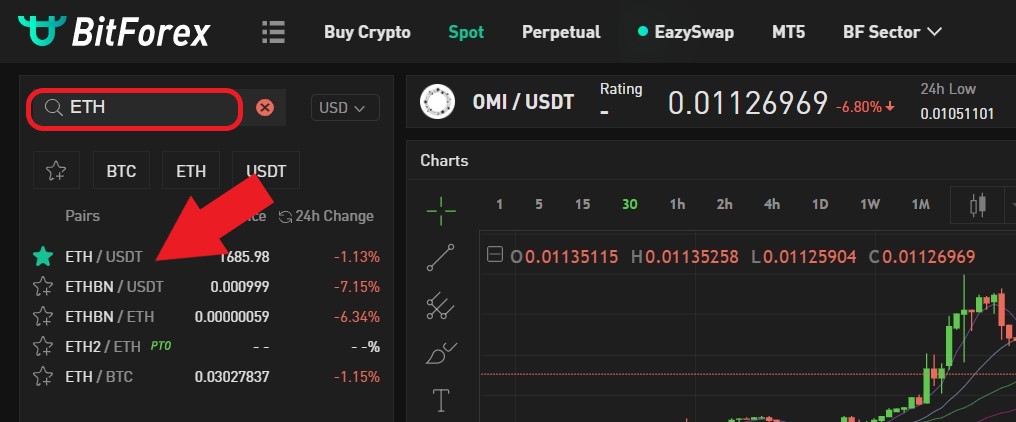
Step 2 - Open ETH token Buy/Sell Screen
a) Input ETH in the Search box and select ETH / USDT
Step 3 - Buy USDT Token
a) Input the amount of ETH tokens you want to Sell or;
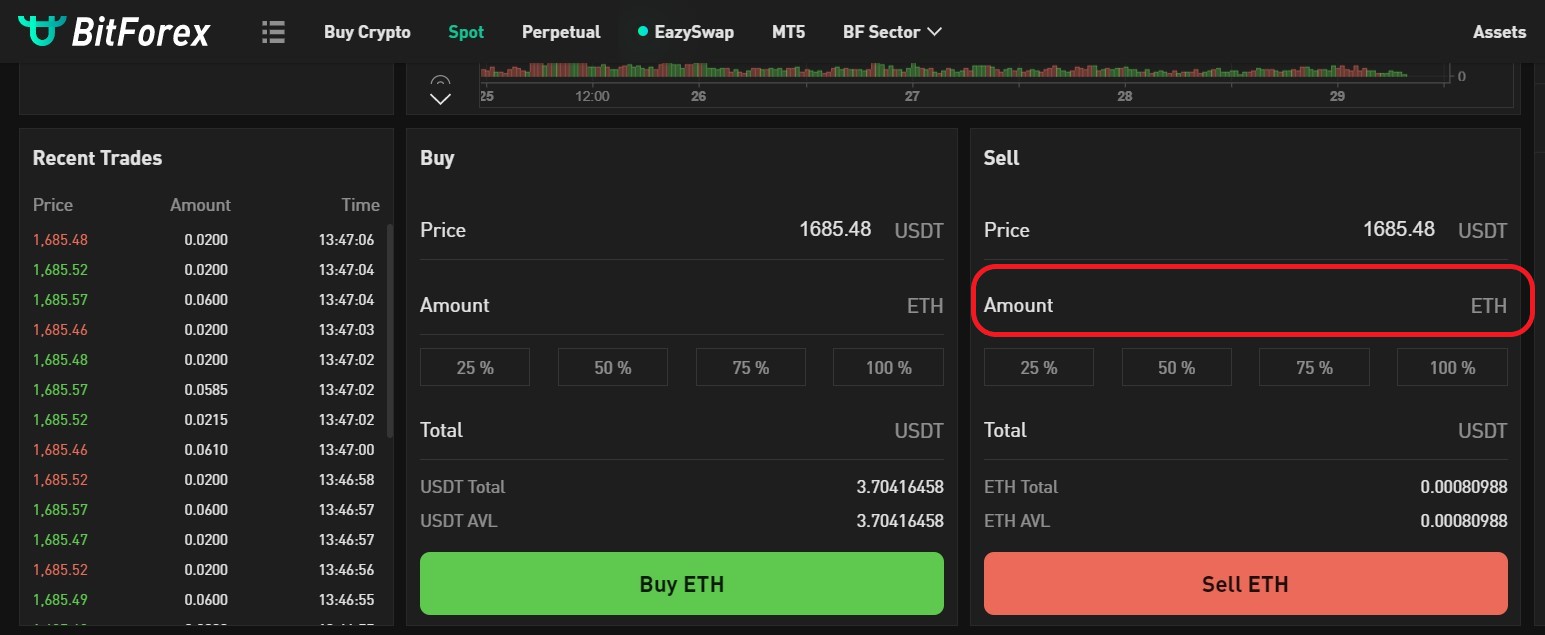
b) Input the amount of USDT you want to Buy with ETH tokens (Note the order may not get filled if the price is higher than the current price)
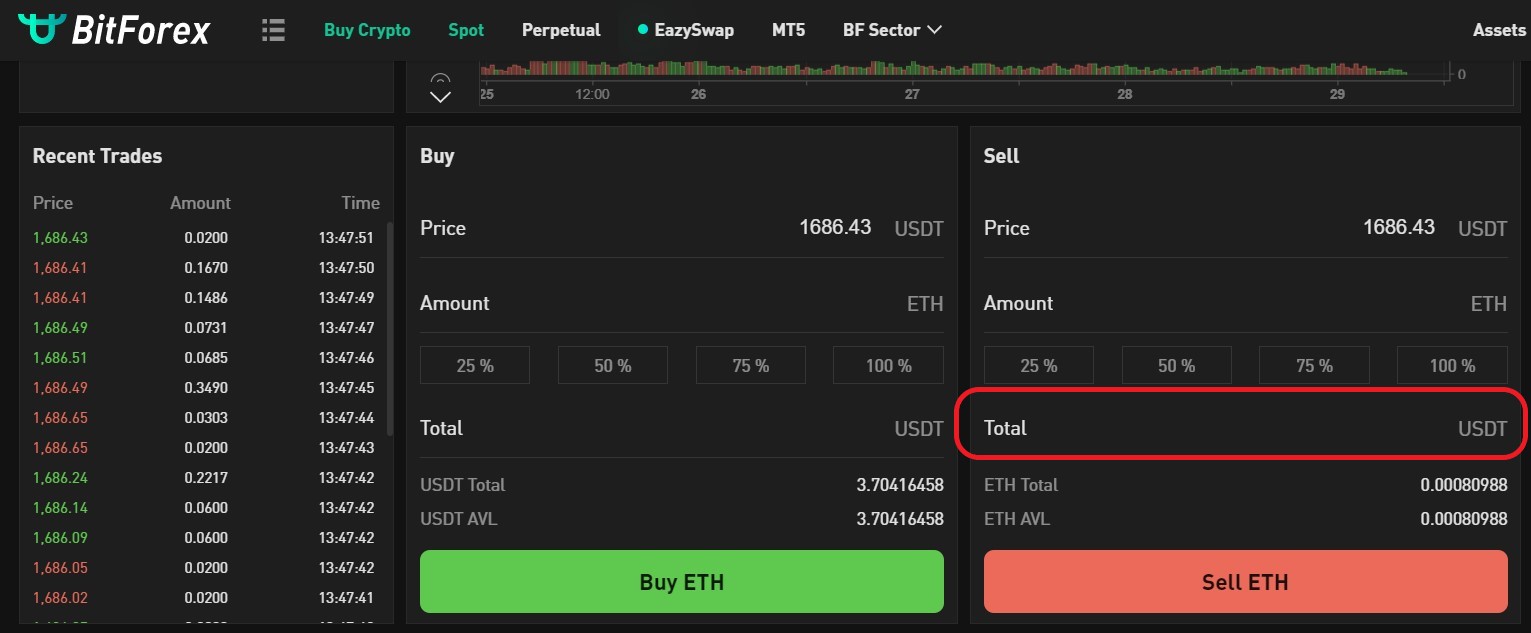
c) Review order (ETH token Amount and USDT Total) and click Sell ETH
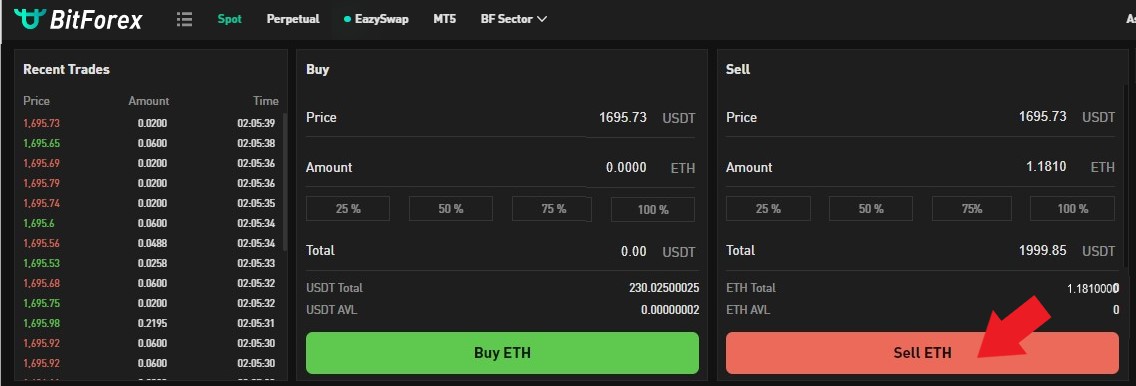
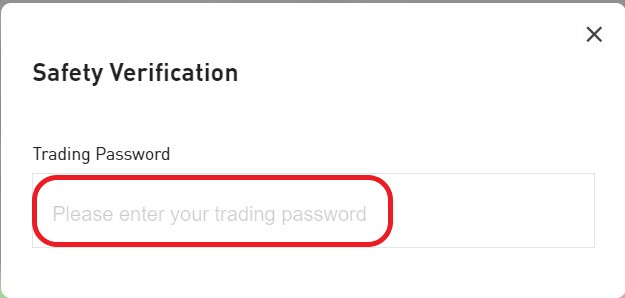
d) Enter your Trading Password
Step 4 - Confirm Pending/Filled Order
a) If the order is still pending (due to the price of the USDT token not being met), the order will show under Open Orders

How to Buy OMI Token with USDT (Tether) on BitForex
Written by Administrator
This is a step-by-step tutorial on how to purchase OMI tokens through your BitForex.com Spot Trading Account. The USDT (Tether) token is required for this transaction. This guide is for devices compatible with Windows 10 and newer, and MacOS 10.11 and higher.
Related Information
If you did not create a BitForex account, go to How to Create a BitForex Exchange Wallet & Trading Account for more information.
If you did not purchase USDT, go to How-To Buy USDT (Tether) with ETH (Ethereum) for more information.
Summary
Step 1 -Go to Spot Trading Screen
Step 2 - Open OMI Token Purchasing Screen
Step 3 - Buy OMI Token
Step 4 - Confirm Pending/Filled Order
Step 1 - Go to Spot Trading Screen
a) From the Home screen, click on Spot
Step 2 - Open OMI token Purchasing Screen
a) Input OMI in the Search box and select OMI/USDT

Step 3 - Buy OMI Token
a) Input the amount of OMI tokens you want to purchase or;
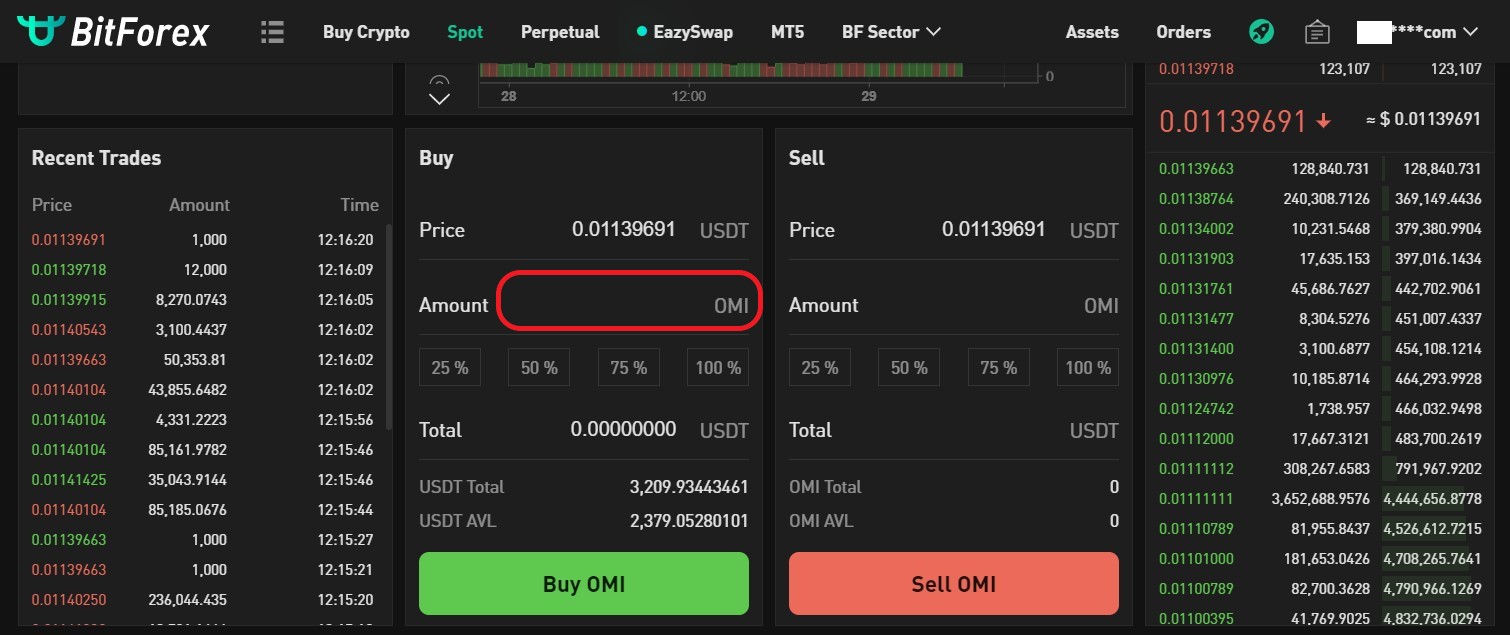
b) Input the amount of USDT you want to spend to purchase OMI tokens
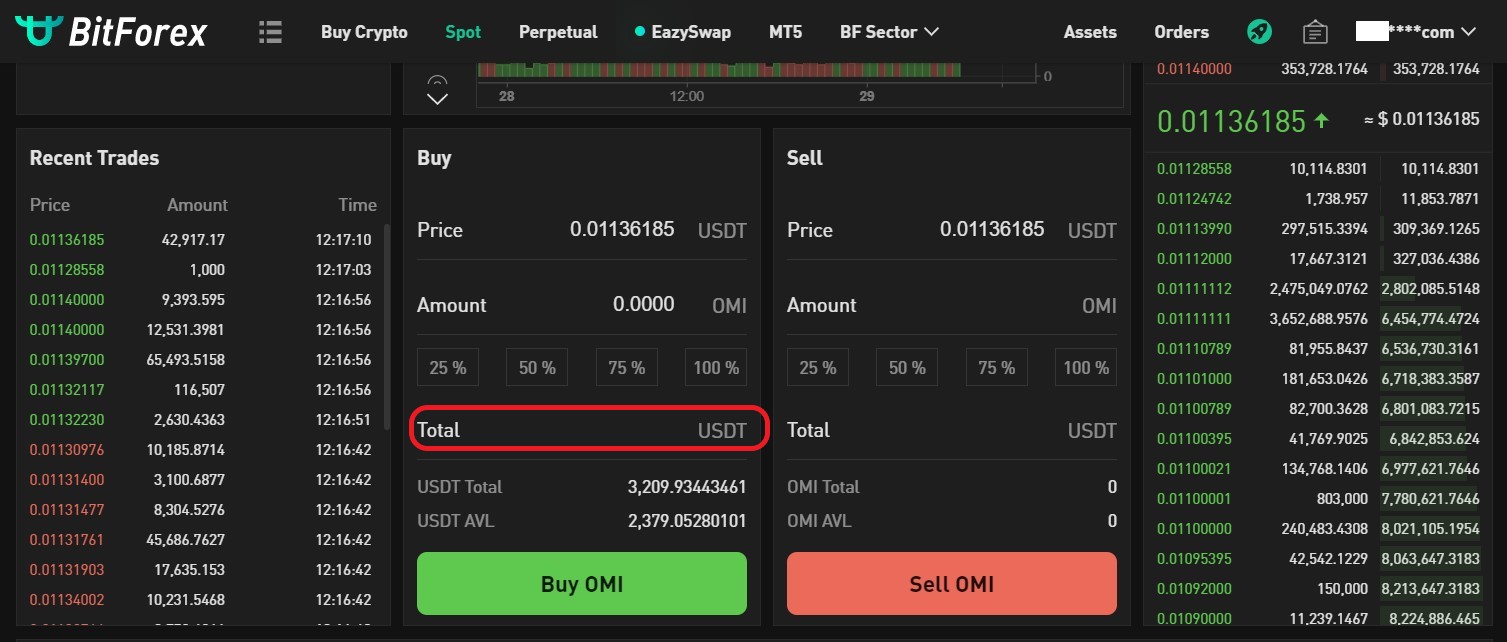
d) Review order (OMI token Amount and USDT Total) and click Buy OMI

e) Enter your Trading Password
Step 4 - Confirm Pending/Filled Order
a) If the order is still pending (due to the price of the OMI token not being met), the order will show under Open Orders

b) If the order is filled, the order will appear under a different screen. To view, click on Order History

c) The completed order will appear in the Order History as Filled

Although the original OMI wallet was available on the beta VeVe App, the option to activate the wallet disappeared after the second upgrade. As a result, the VeVe wallet is still available on their mobile app for those that activated it during the beta stage and is only available online for newer app users.
This article provides a guide to open your existing VeVe OMI wallet online. This guide is for devices compatible with Windows 10 and newer, and MacOS 10.11 and higher.
Note:
You must have a VeVe app account established in order to create a VeVe Wallet.
The VeVe App ties your VeVe collectibles, VeVe Gem wallet, and OMI wallet into one repository.
Contents
Open wallet portal
Open Wallet Portal
a) Go to https://omi.veve.me/
a) Open Crypto.com app and click on Transfer
![]()
b) Click on Withdraw
![]()
c) Click on Crypto
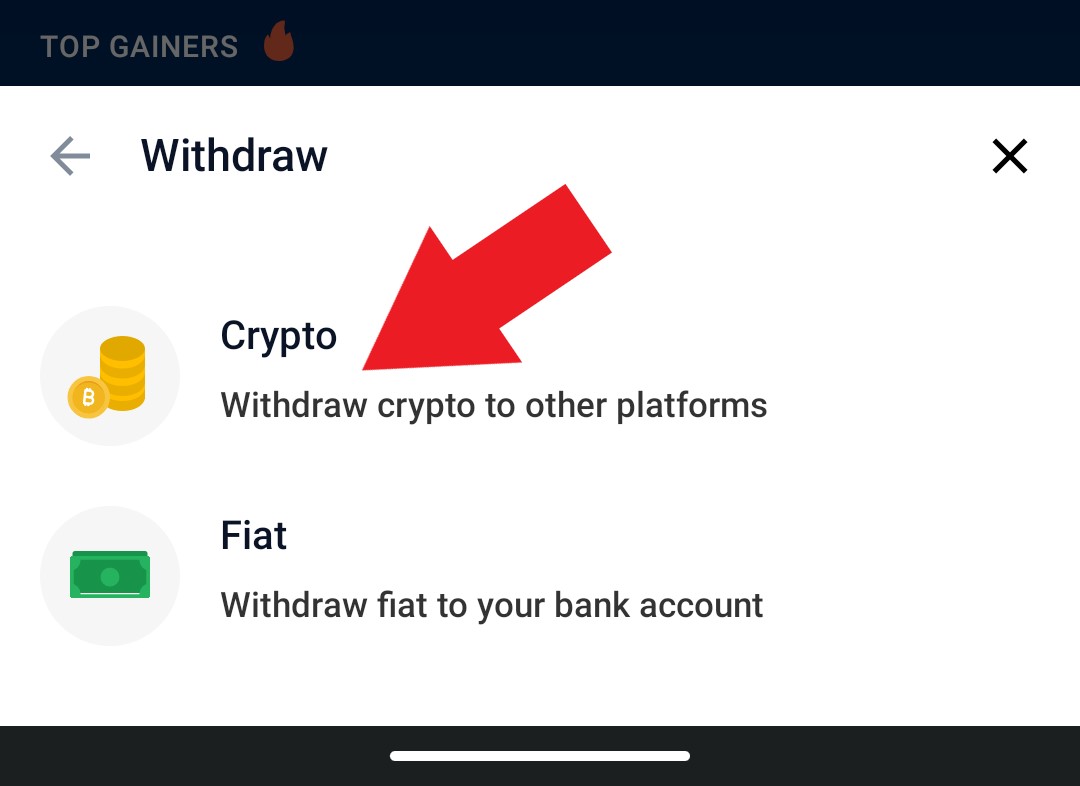
d) Click on External Wallet
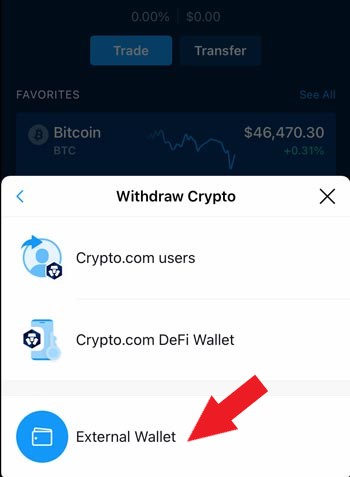
e) Select Add Wallet Address
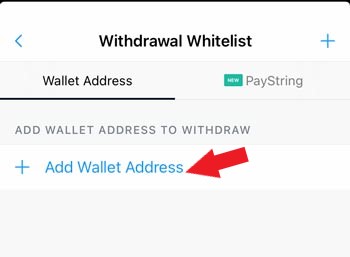
f) Select Ethereum (Note this example is based on Ethereum) or applicable cryptocurrency.

j) Select the QR code symbol
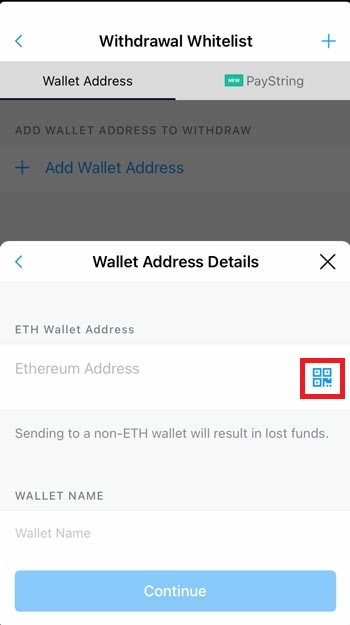
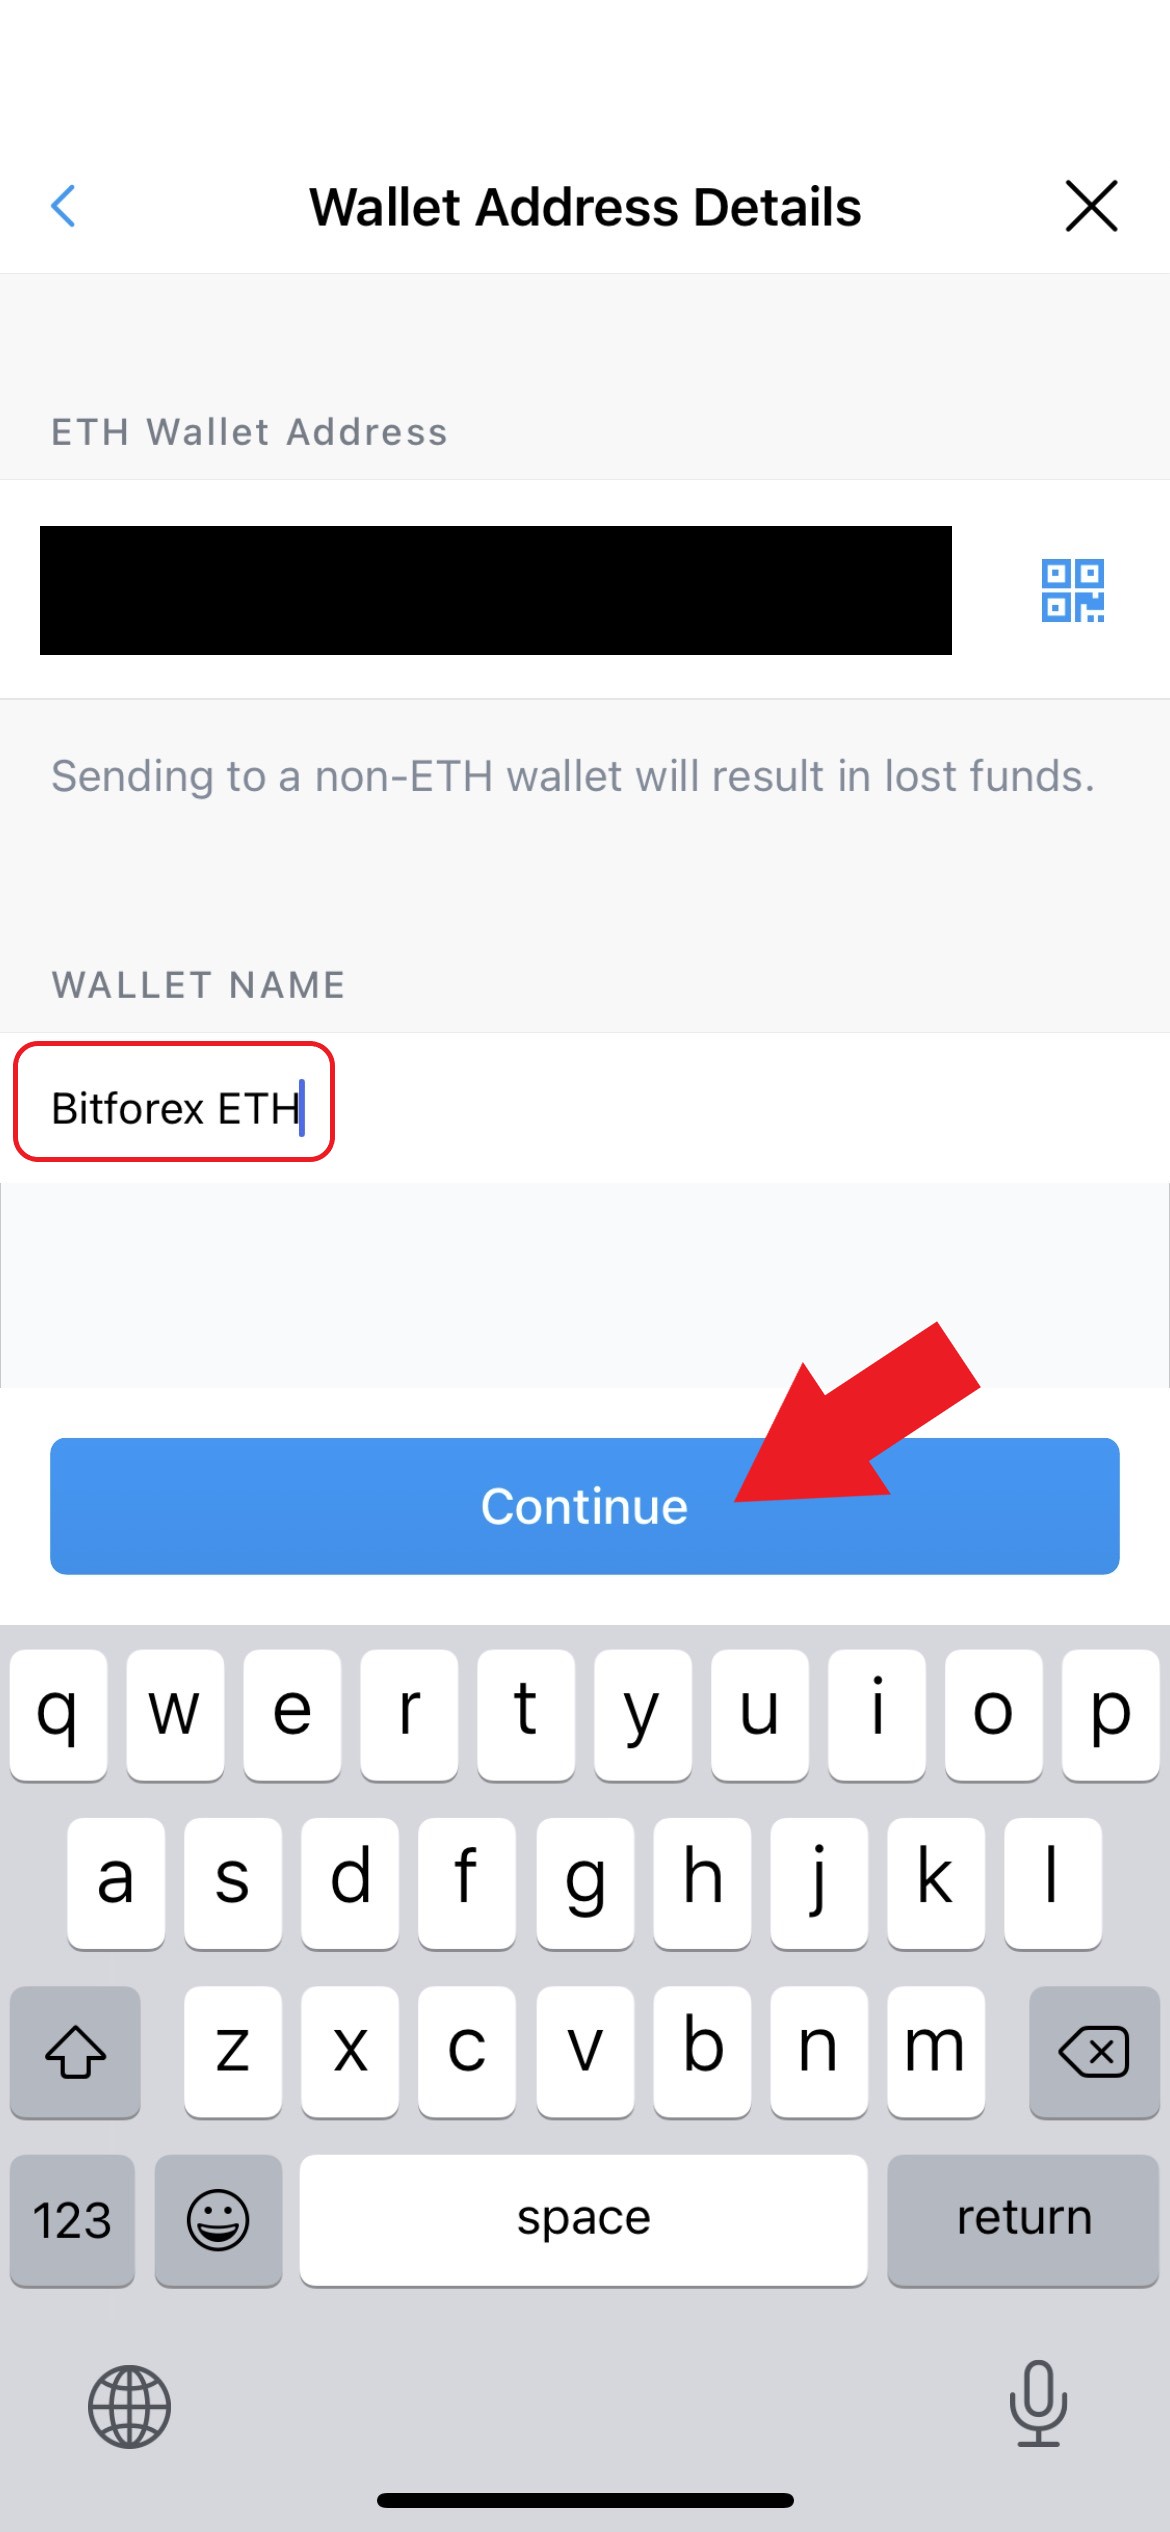
k) Scan the cryptocurrency exchange's QR code and the Ethereum Address will populate on your phone. Input WALLET NAME (Exchange Name) ETH and select Continue. ie. BitForex ETH
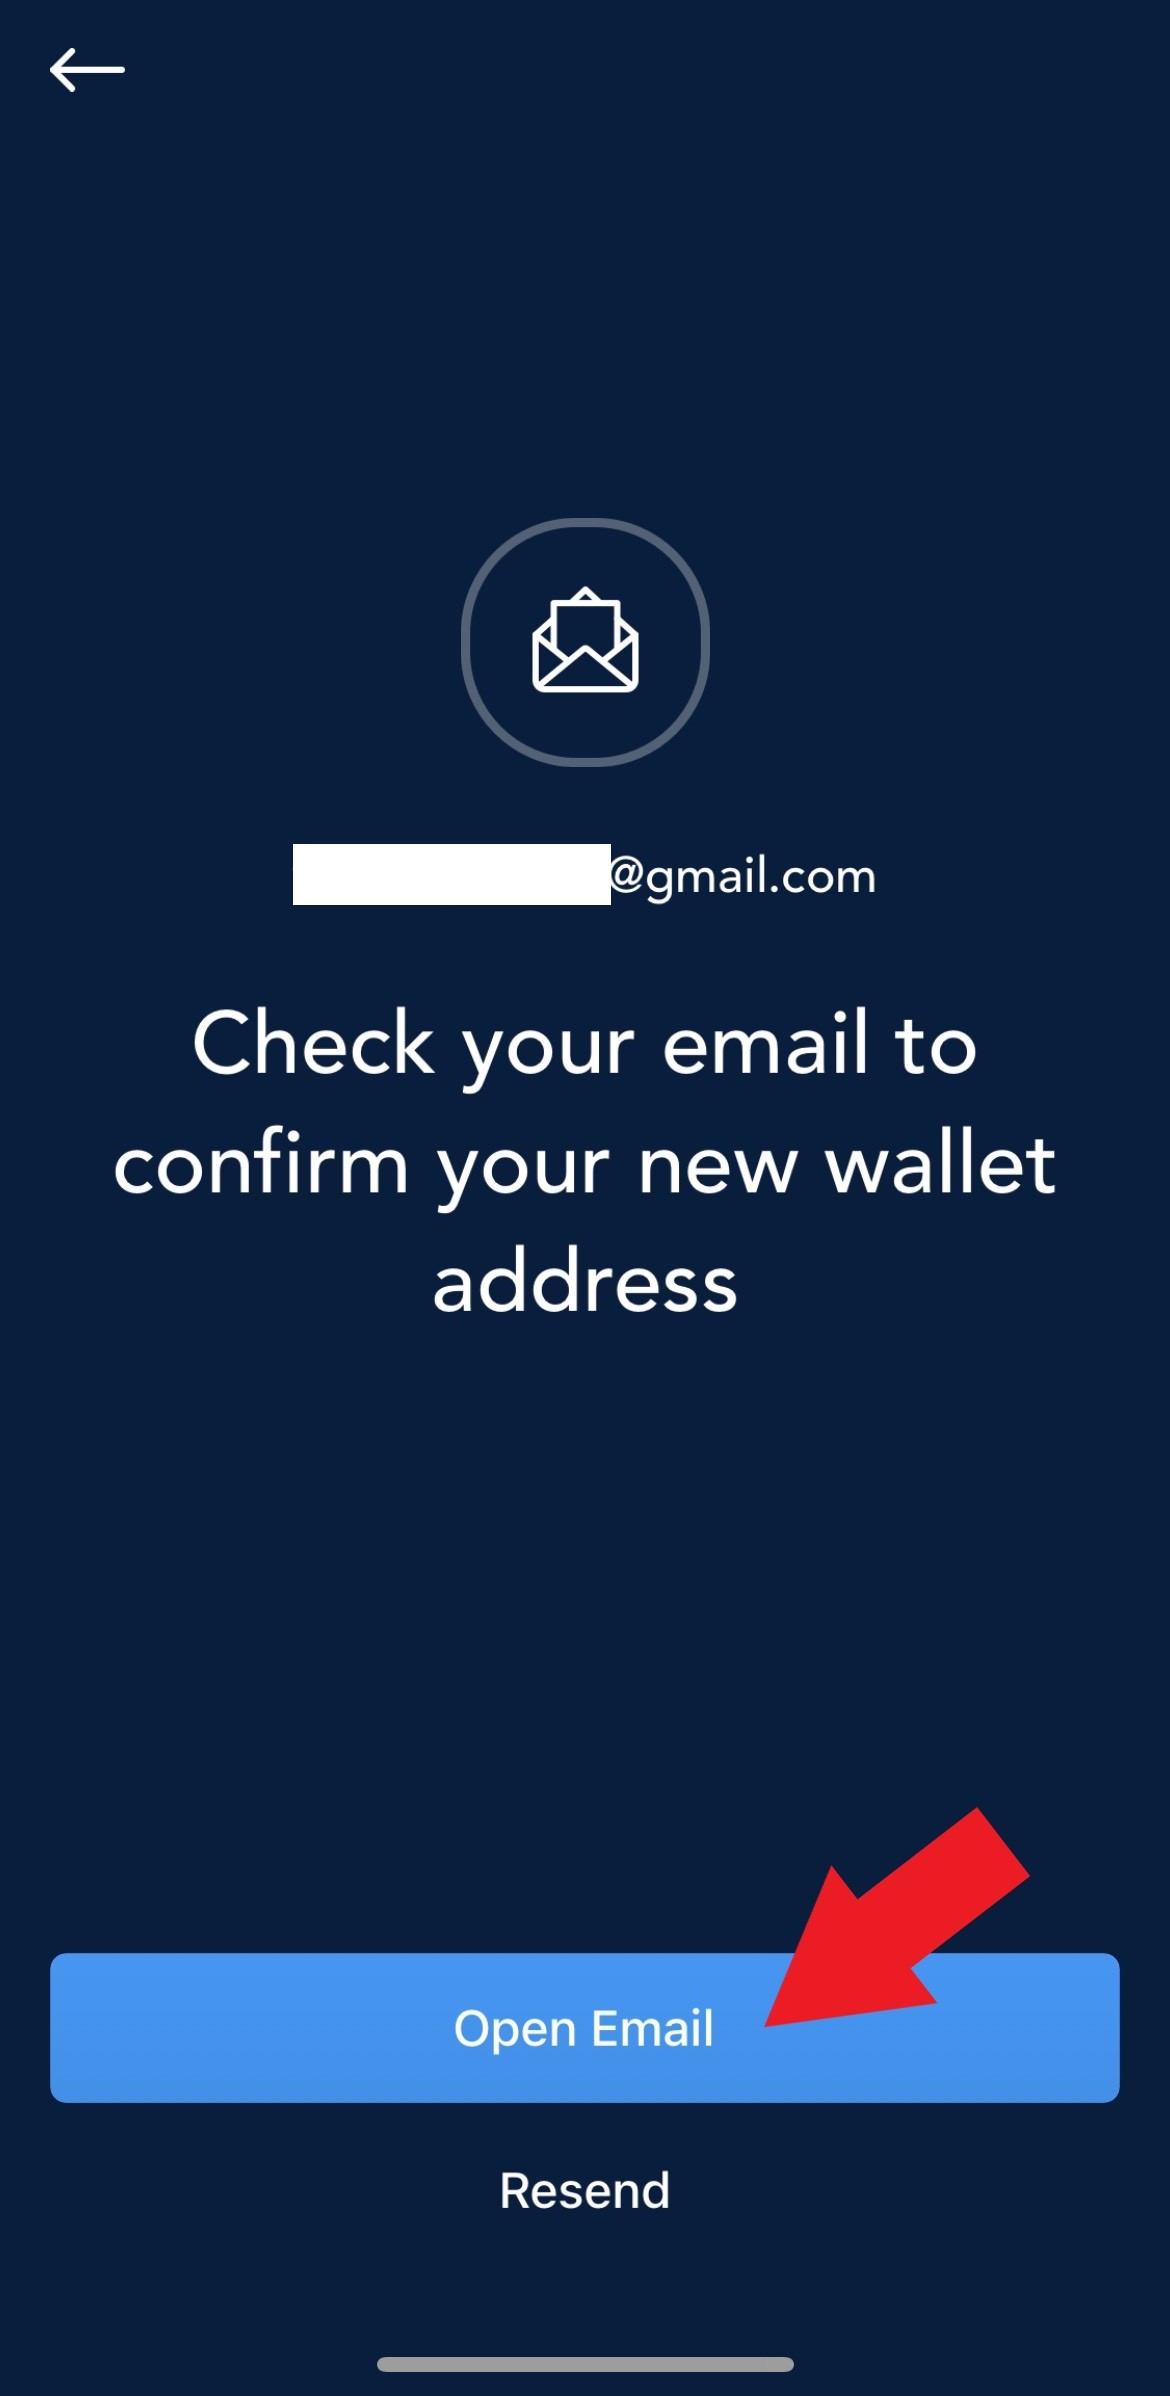
l) Check your email to confirm your new wallet address screen will appear. Select Open Email.
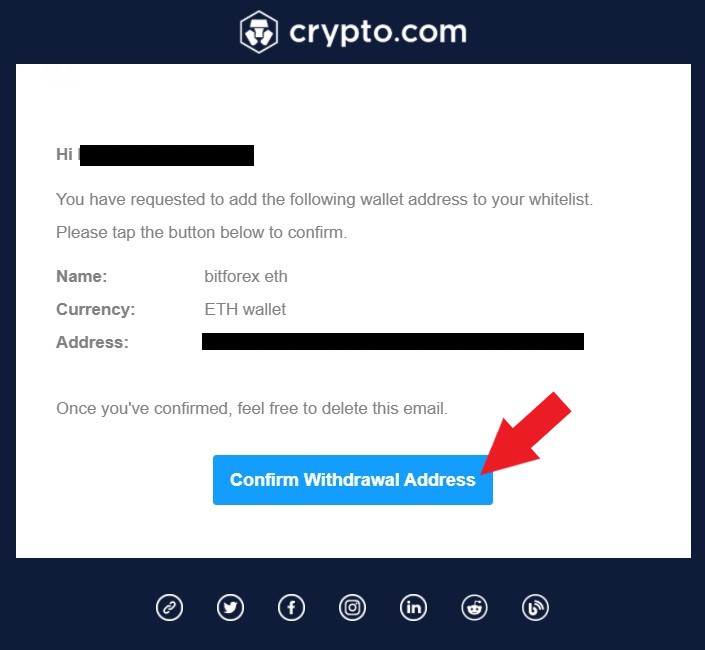
m) Open your email from your mobile phone and select Confirm Withdrawal Address
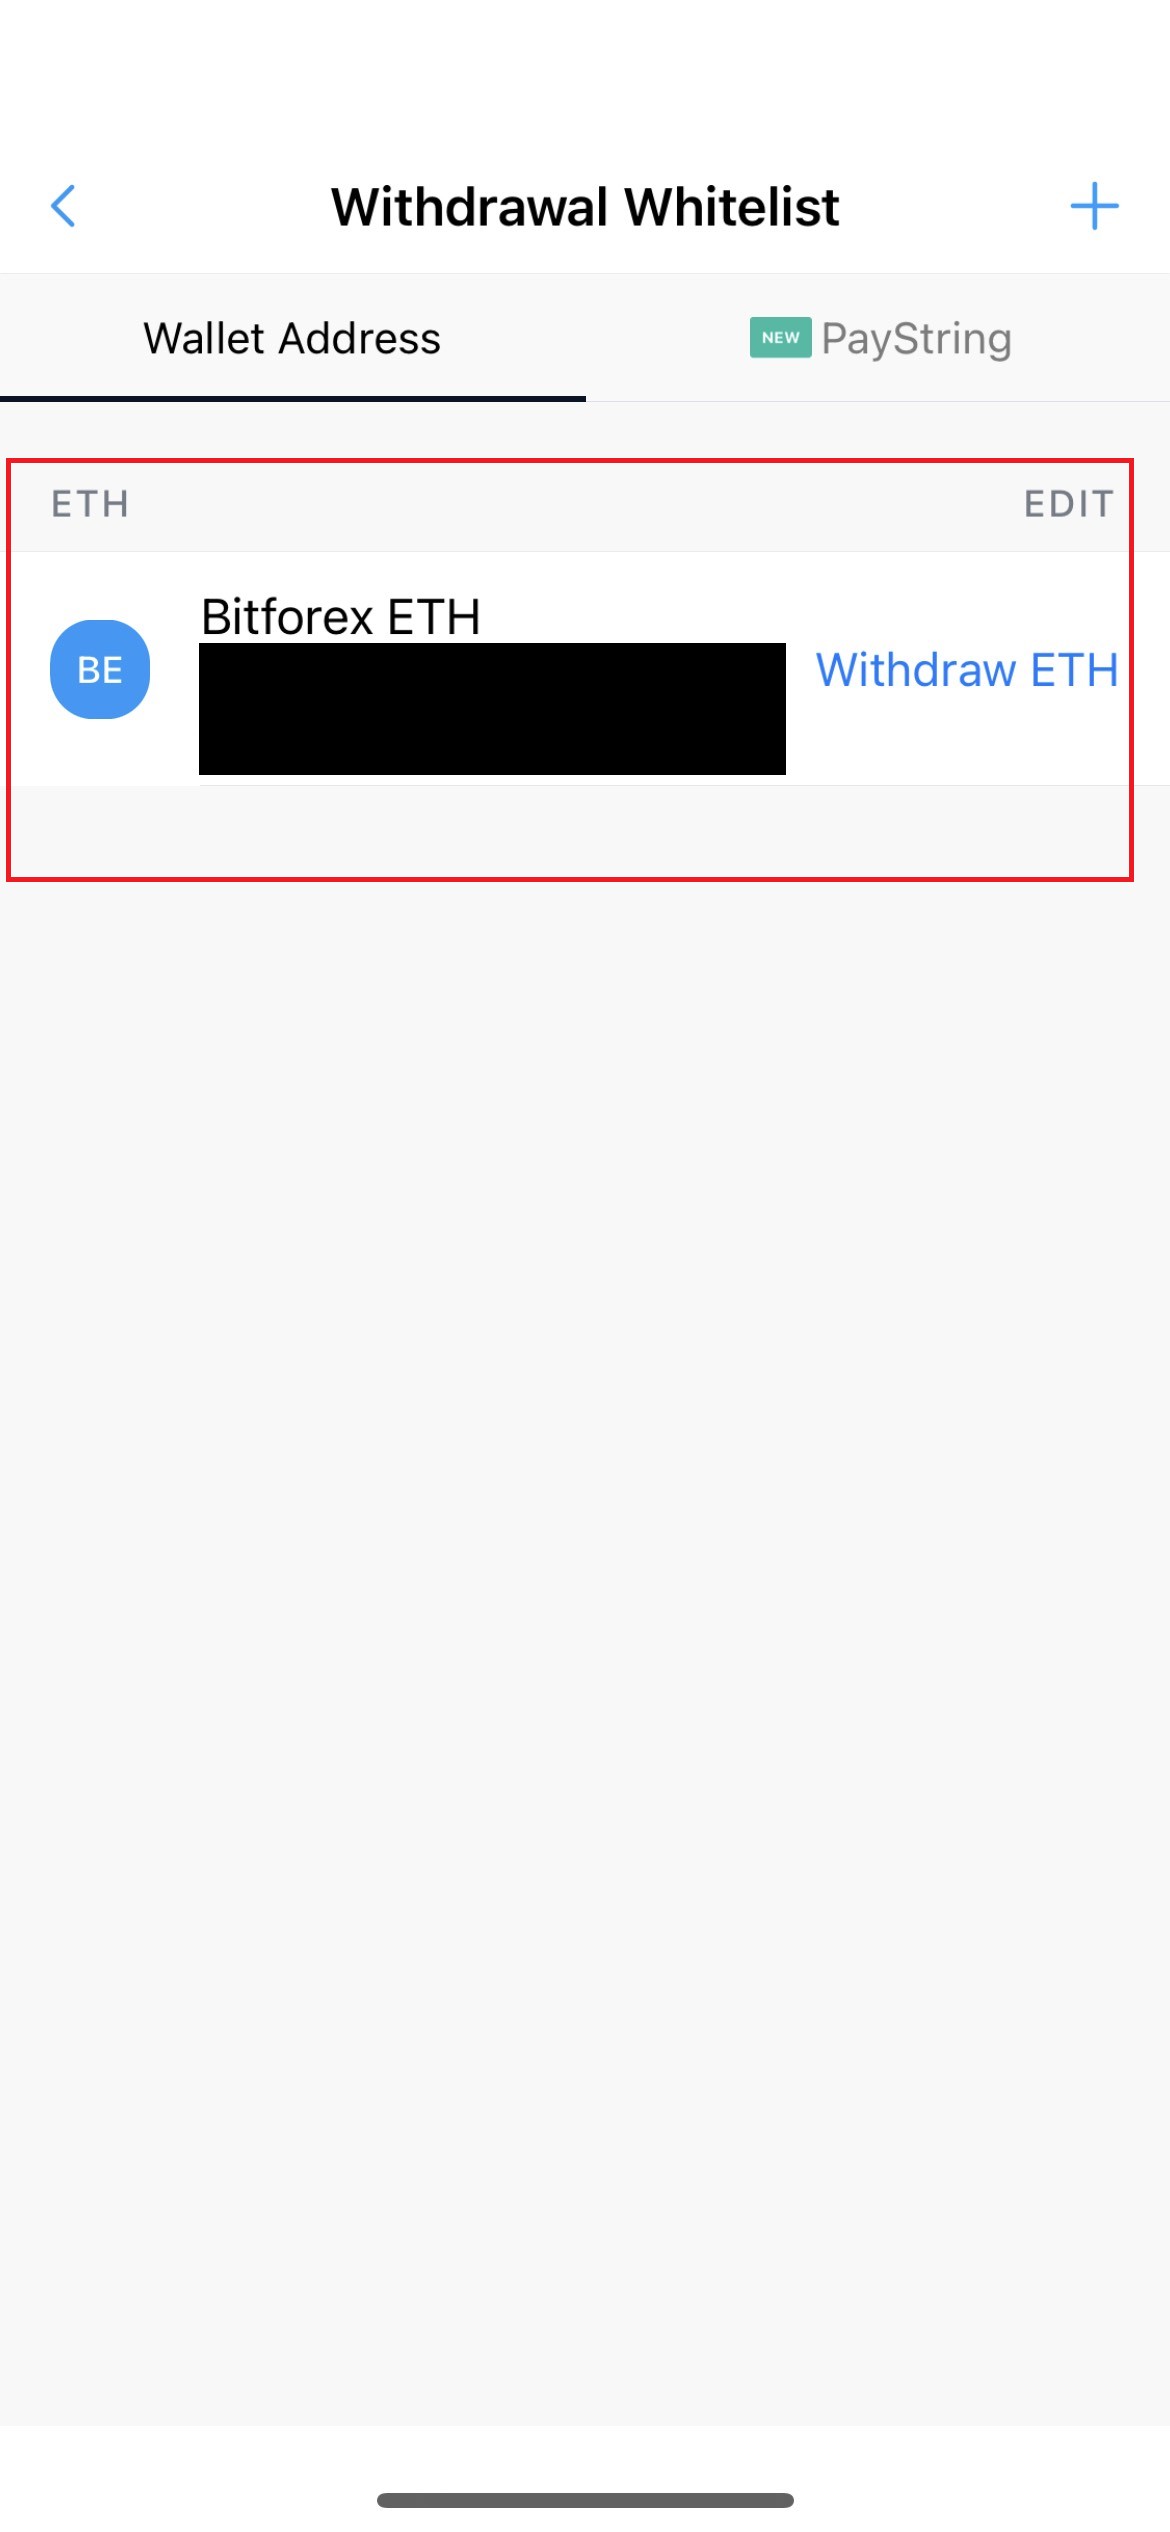
n) The address will appear in your Withdrawal Whitelist
This is a step-by-step guide on how to buy the OMI token securely. This guide is for devices compatible with Windows 10 and newer, MacOS 10.11 and higher, Android OS, and Apple iOS.
The OMI token "serves as a medium of exchange," where you buy, sell, or trade your digital collectibles on the VeVe app.[1] ECOMI Technologies PTE Ltd, based out of Singapore initially listed their OMI token through BitForex.com[2] on May 13, 2019.
Contents
Step 1 - Create a Fiat Wallet With a Crypto Exchange (This guide will use Crypto.com)
Step 2 - Purchase Ethereum
Step 3 - Create a BitForex Wallet and Setup Security Settings
Step 4 - Register BitForex.com Wallet in Crypto.com Wallet
Step 5 - Transfer Ethereum to BitForex Wallet
Step 6 - Transfer Ethereum to Spot Wallet
Step 7 - Buy USDT tokens
Step 8 - Buy OMI token
The initial step is to get a crypto-fiat wallet so that you can purchase Ethereum cryptocurrency with U.S. dollars. If you already have Ethereum, go to Step 3.
Step 1 - Create a Fiat Wallet with a Crypto Exchange
a) U.S. Citizens (excludes New York)
i) Create a Crypto.com Wallet Please use the referral code xkh64rqrh2
b) U.S. Citizens (excludes Alabama, Rhode Island, and Hawaii)
i) Create a Binance.us Wallet
c) International (excludes U.S. citizens)
i) Create a Binance.com Wallet
Step 2 - Purchase Ethereum
Be forewarned this is the step that can be burdensome because your cryptocurrency purchase may get blocked depending on your bank/credit card company's policy on cryptocurrency purchases. This may result in many irate calls to your bank requesting them to take a hold off of your account. Some may refuse and you may need to change banks. USAA is a great bank that allows cryptocurrency purchases.
Note: I recommend you use a debit card by Visa.
a) Log in to Crypto.com App and select Trade
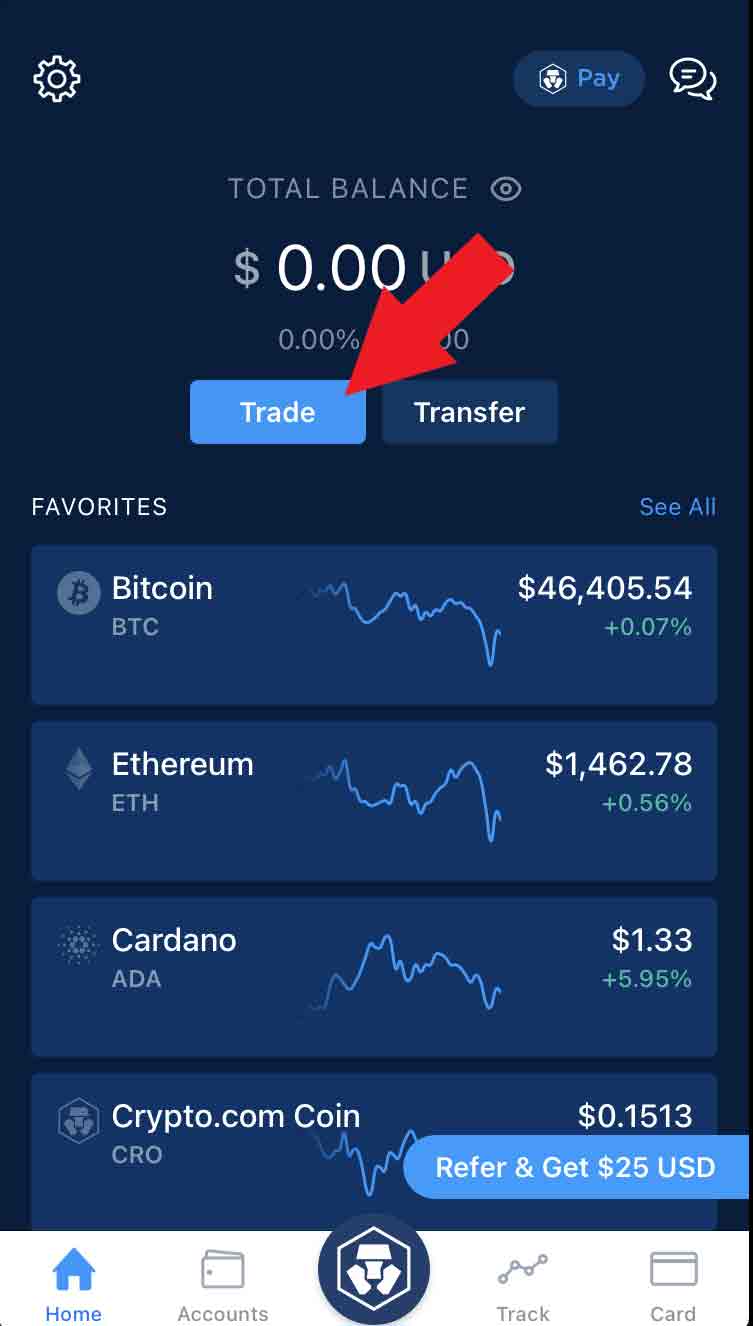
b) Select Buy
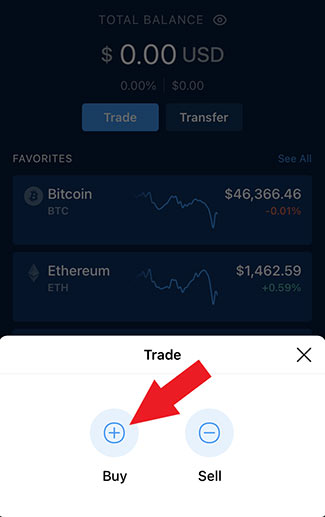
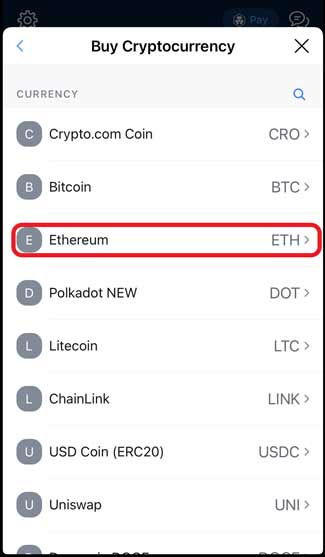
c) Select Ethereum
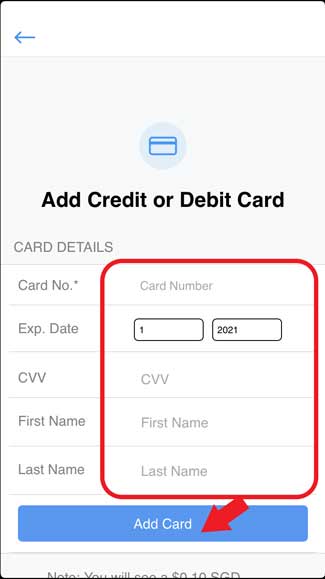
d) Select + Add Credit or Debit Card
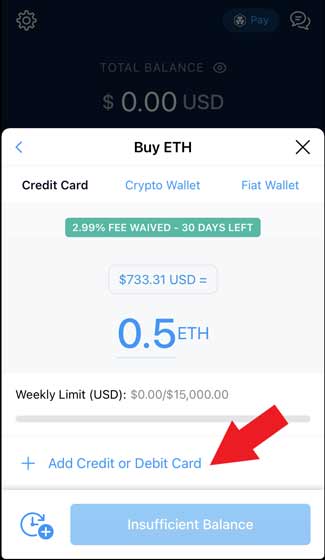
e) Input your card information and select Add Card
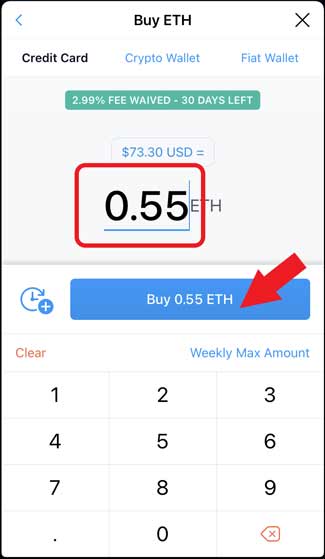
f) Input the amount of Ethereum to purchase and select Buy (Amount) ETH
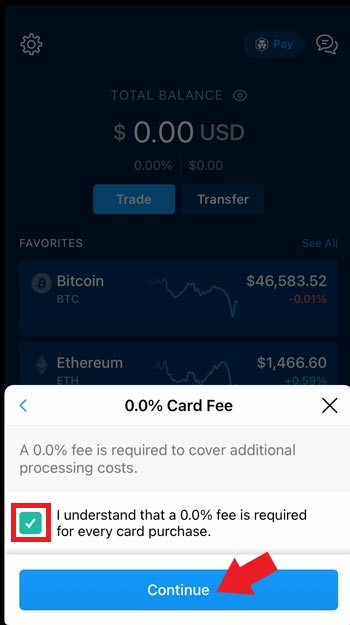
g) Select the box I understand that a 0.0%(Note the example is during a no-fee promotion) is required for every card purchase and select Continue
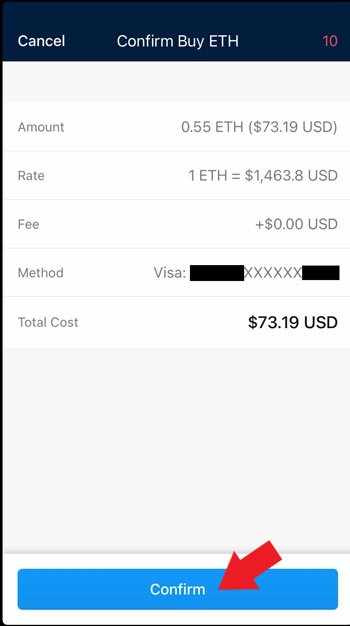
h) Select Confirm
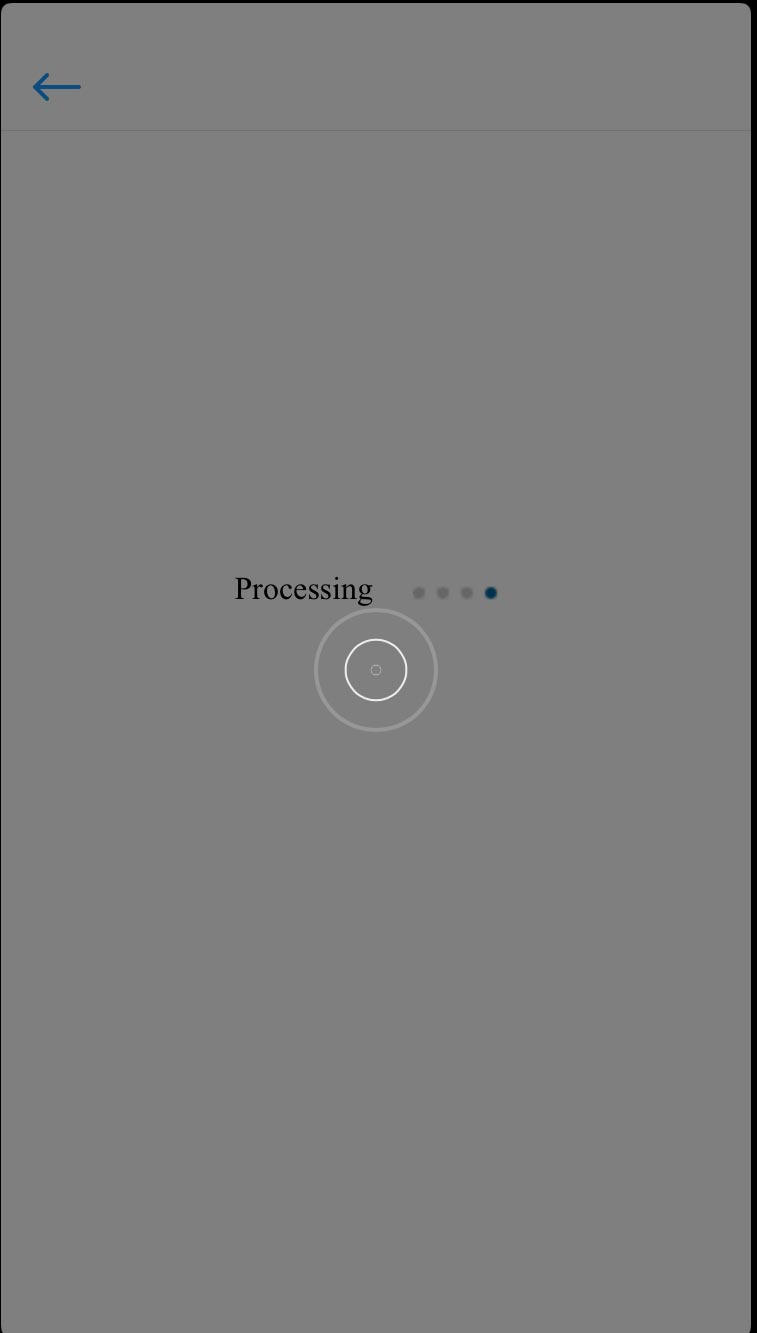
i) Processing screen will appear
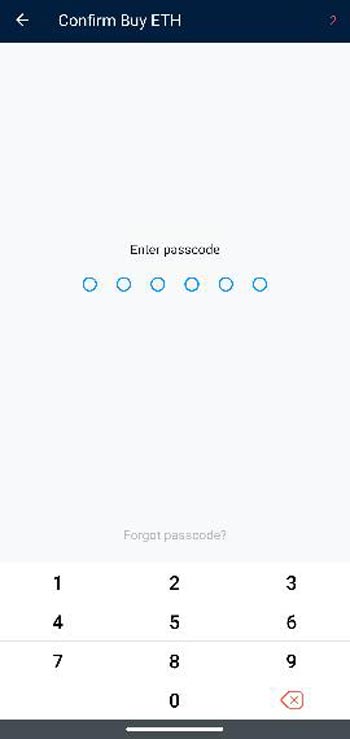
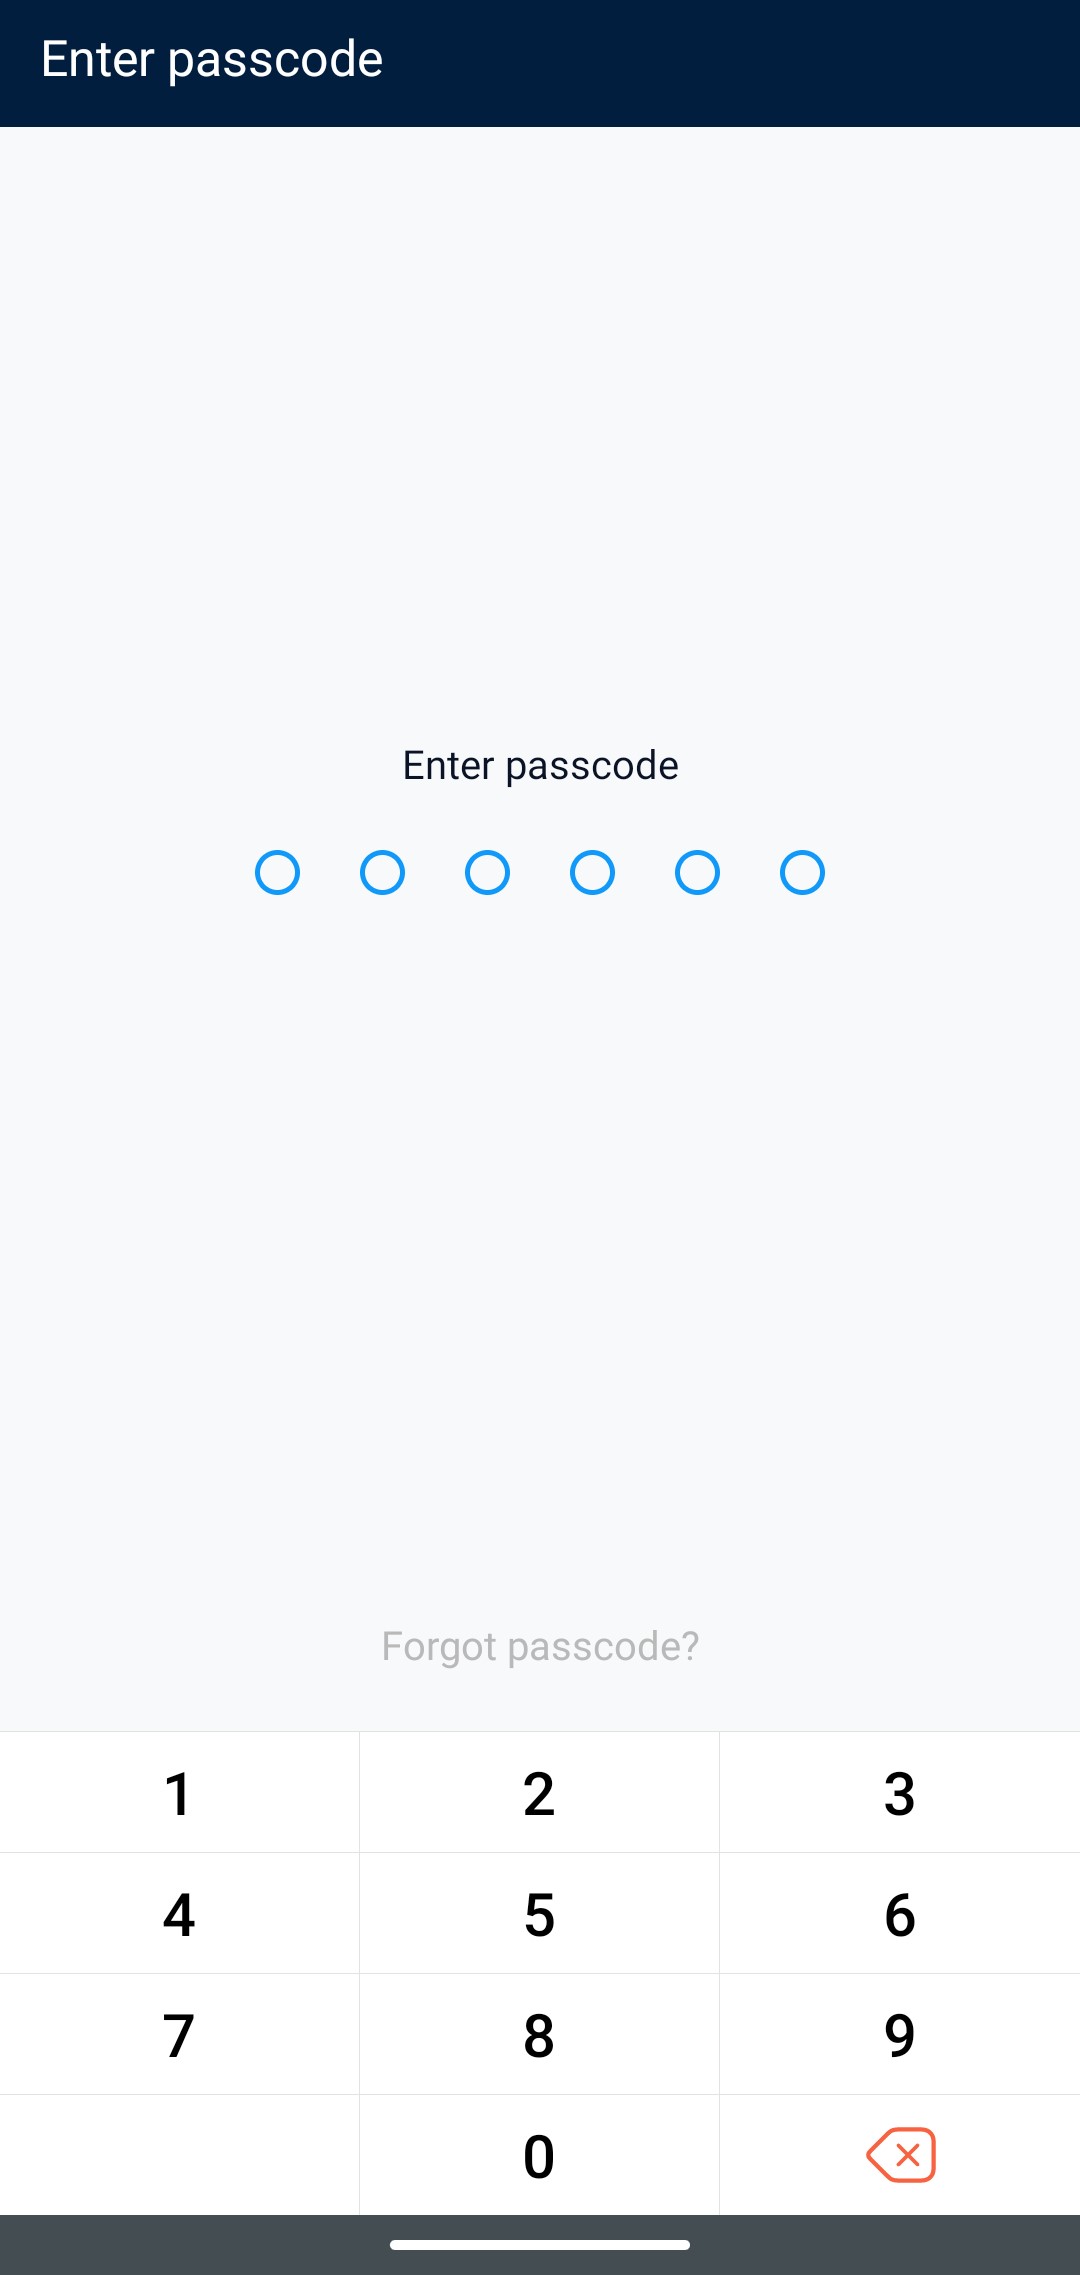
j) Enter Passcode
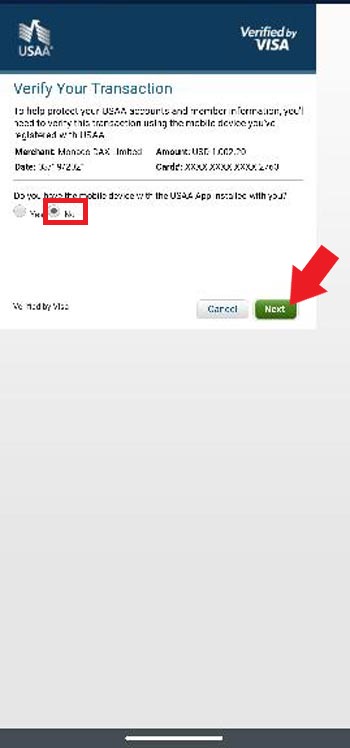
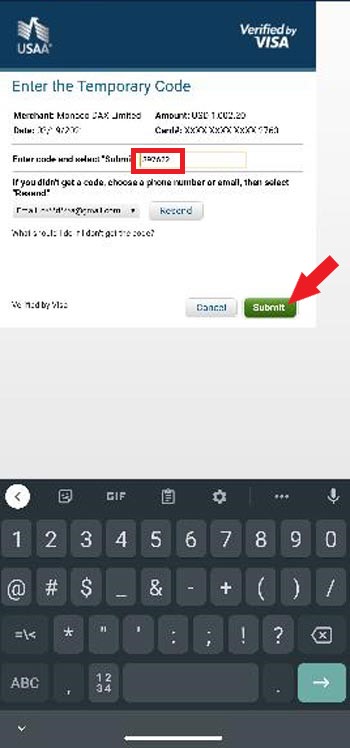
k) Verify your transaction (this is an example from USAA)
i) Select No(so that you can conduct the transaction on the App) and select Next
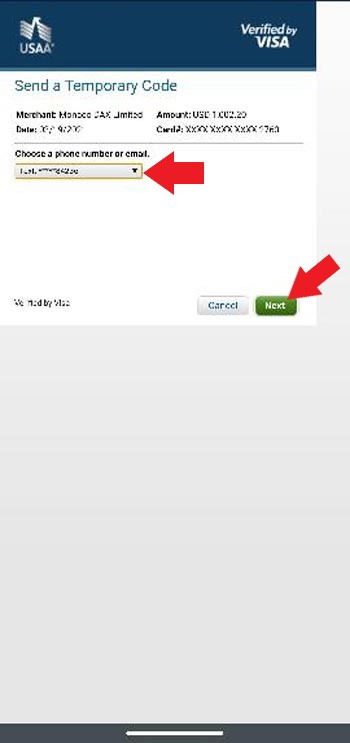
ii) Select how your temporary code gets sent to you via email or phone text and select Next
iii) Enter the temporary code (Received through email or text) and select Submit
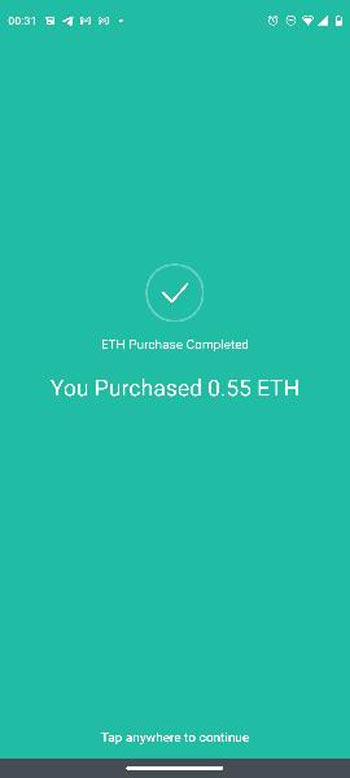
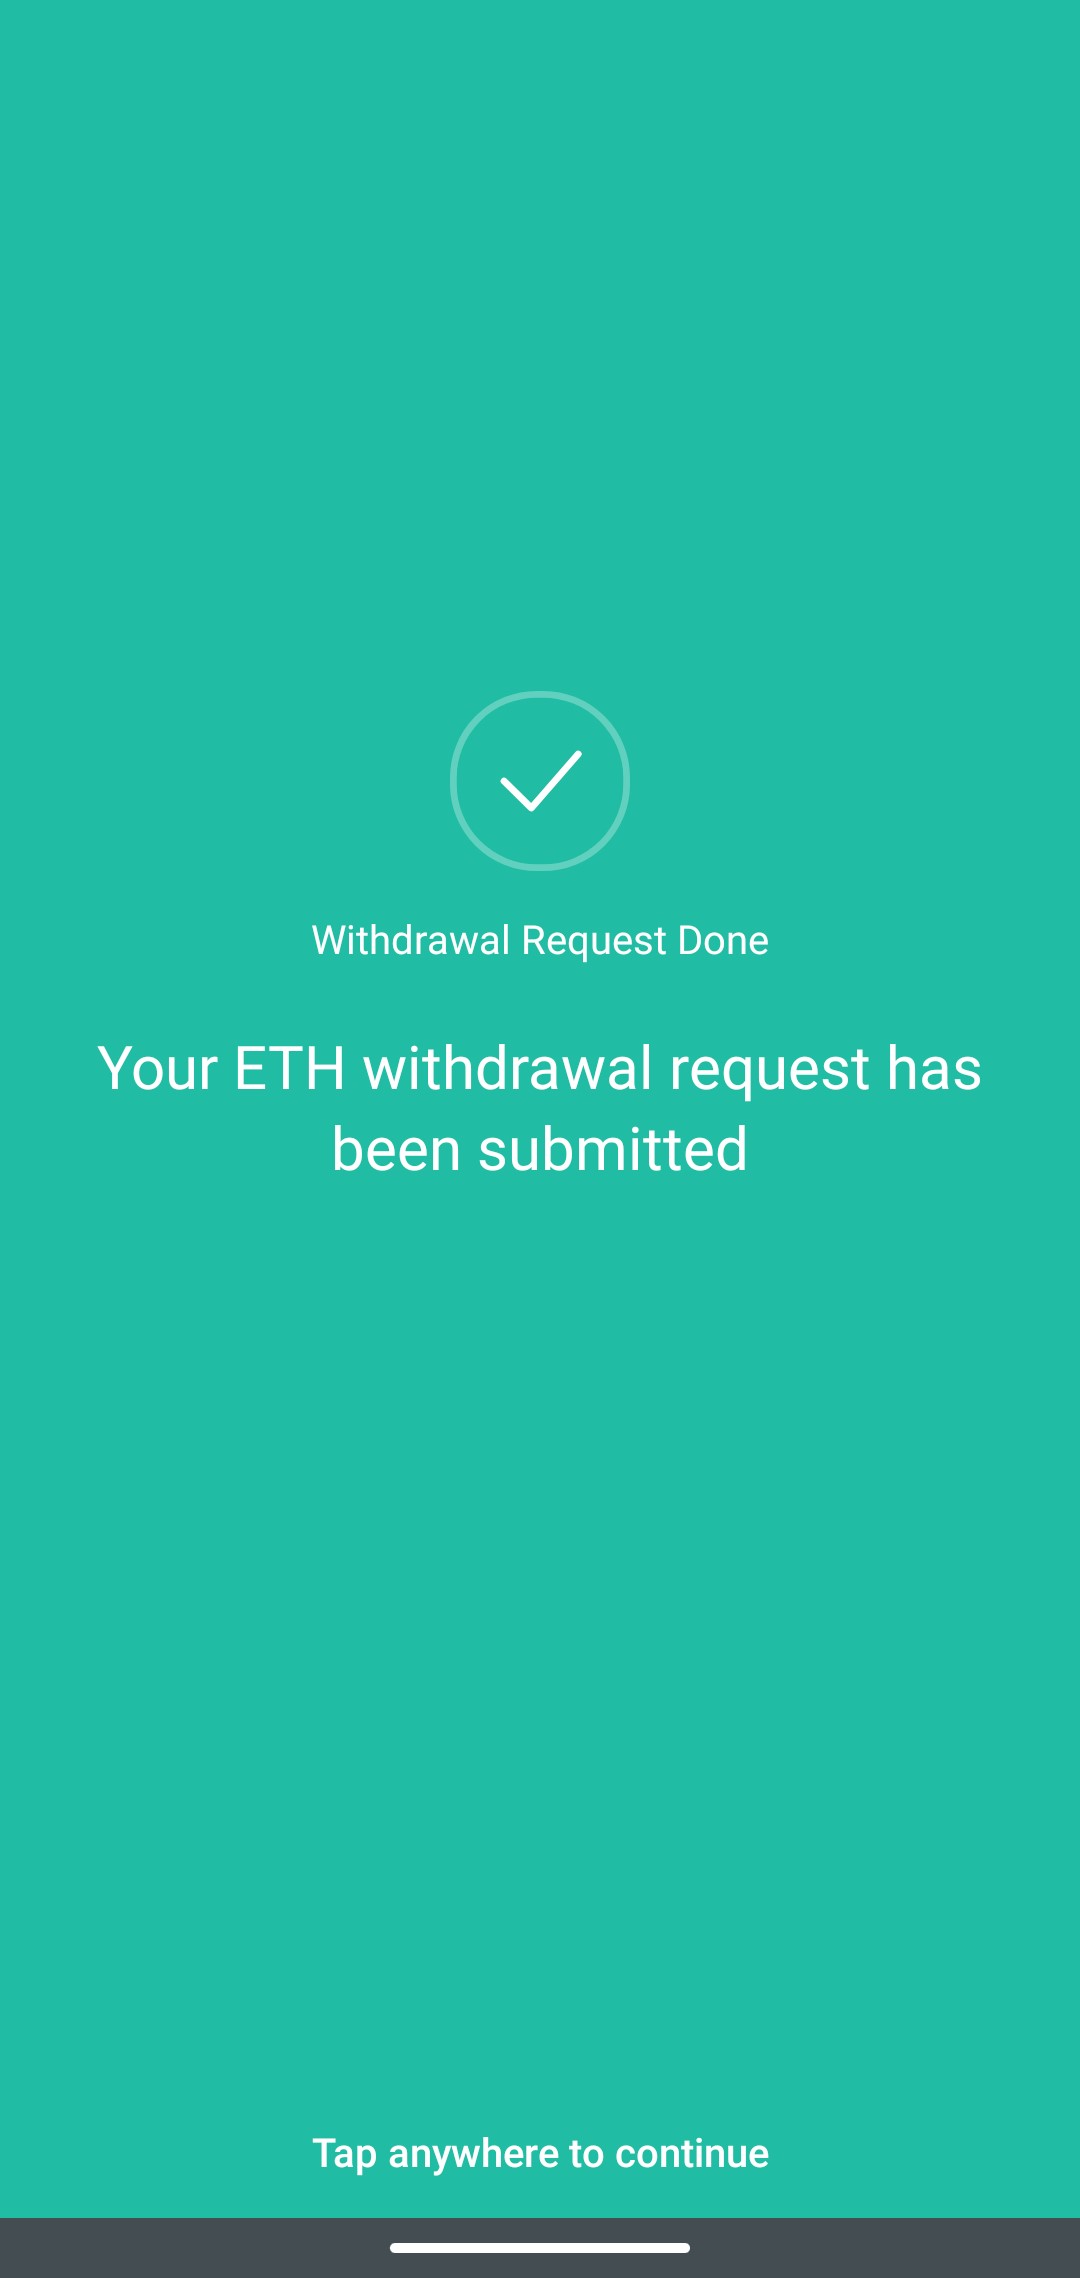
l) You have successfully purchased Ethereum and will get the following message.Tap anywhere to close the message.
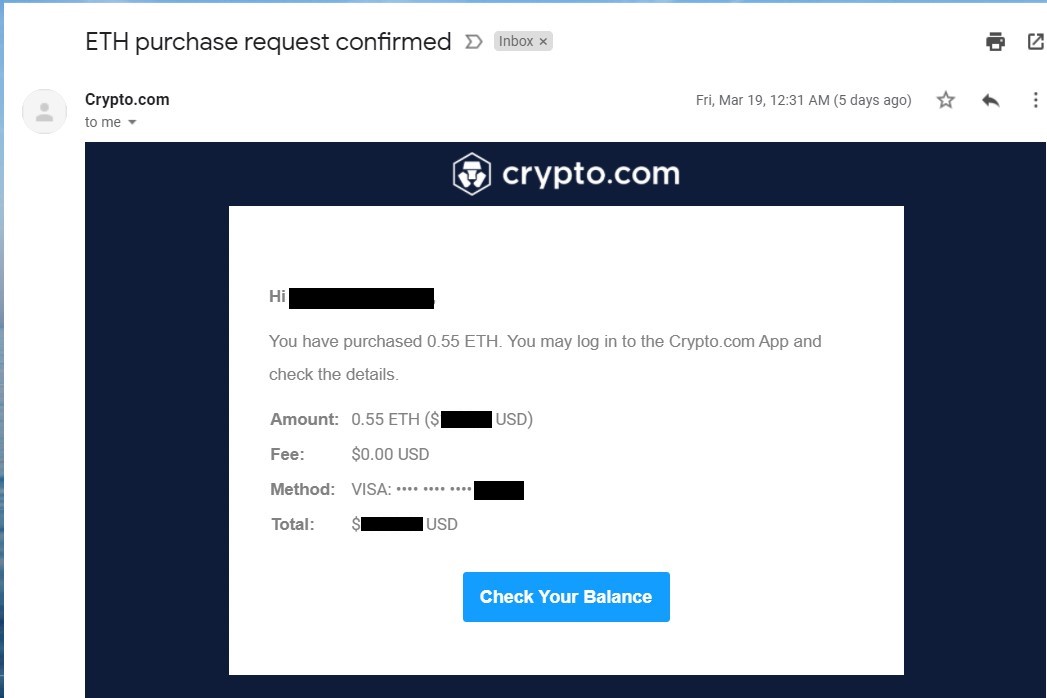
m) You will receive an email from Crypto.com confirming your purchase. Note: It may take a while for your transaction to go through (sometimes 2+ hours)
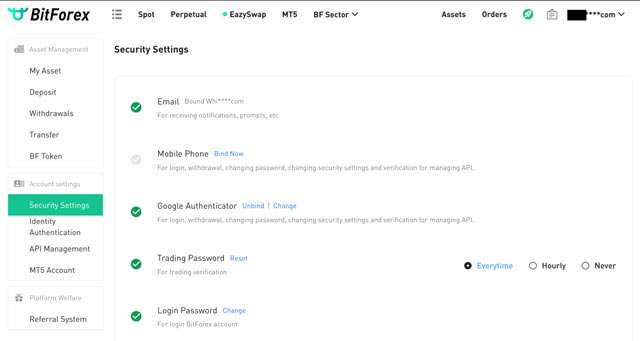
Step 3 - Create a BitForex Wallet and Setup Security Settings
Prior to performing this step, you must have Google Authenticator installed on your mobile phone.
a) Create a BitForex Wallet and Spot Trading Account
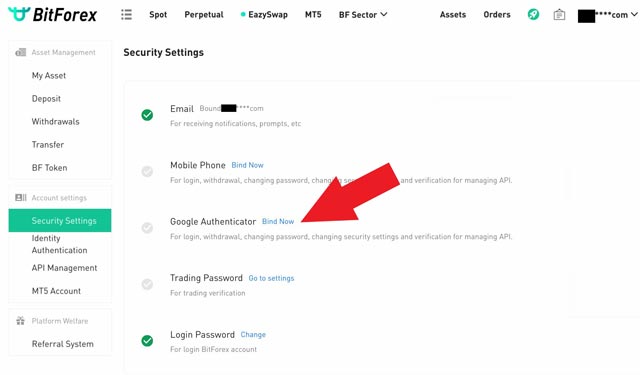
b) Setup Google Authenticator secondary passcode
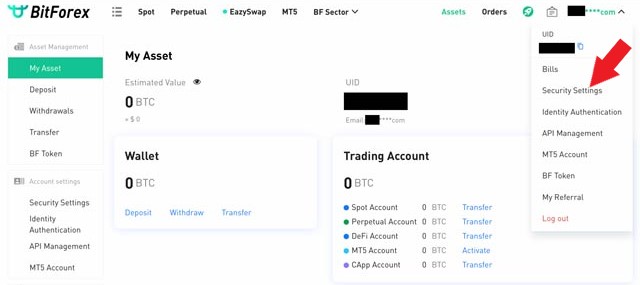
i) Click on the dropdown

ii) SelectSecurity Settings
iii) Click on Bind Now under Google Authenticator
iv) Click Send (a verification code will be sent to your email address)
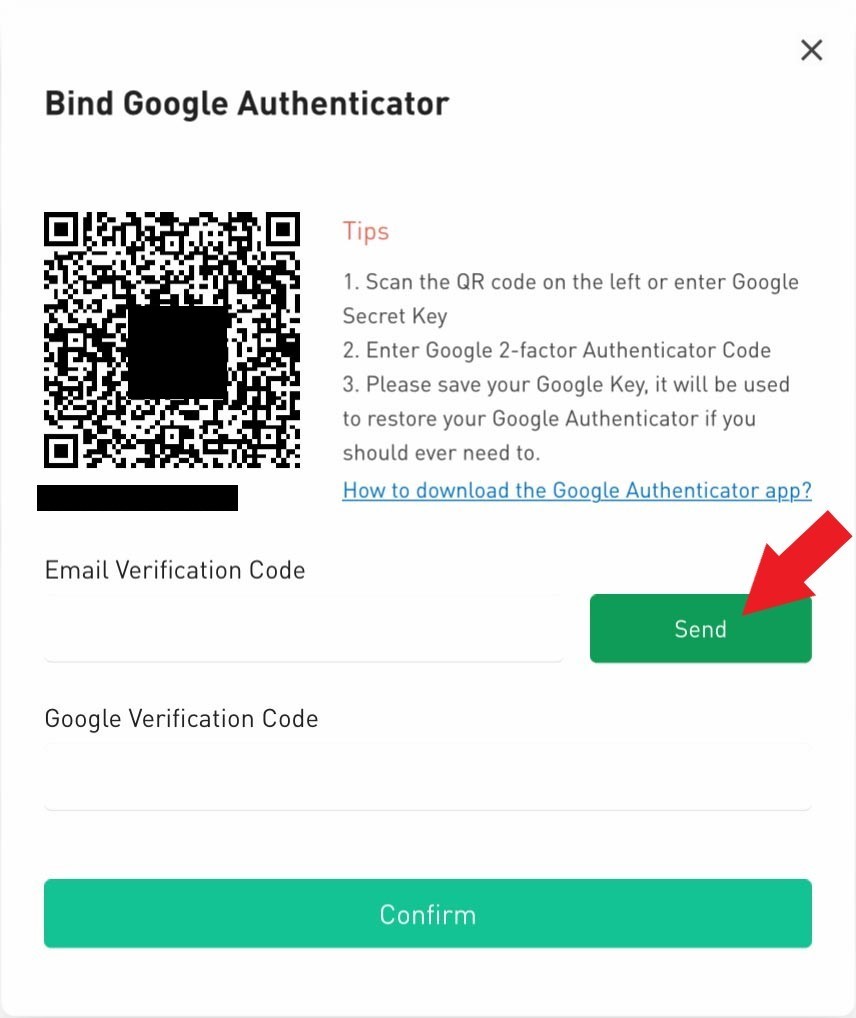
v) Enter the Email Verification Code
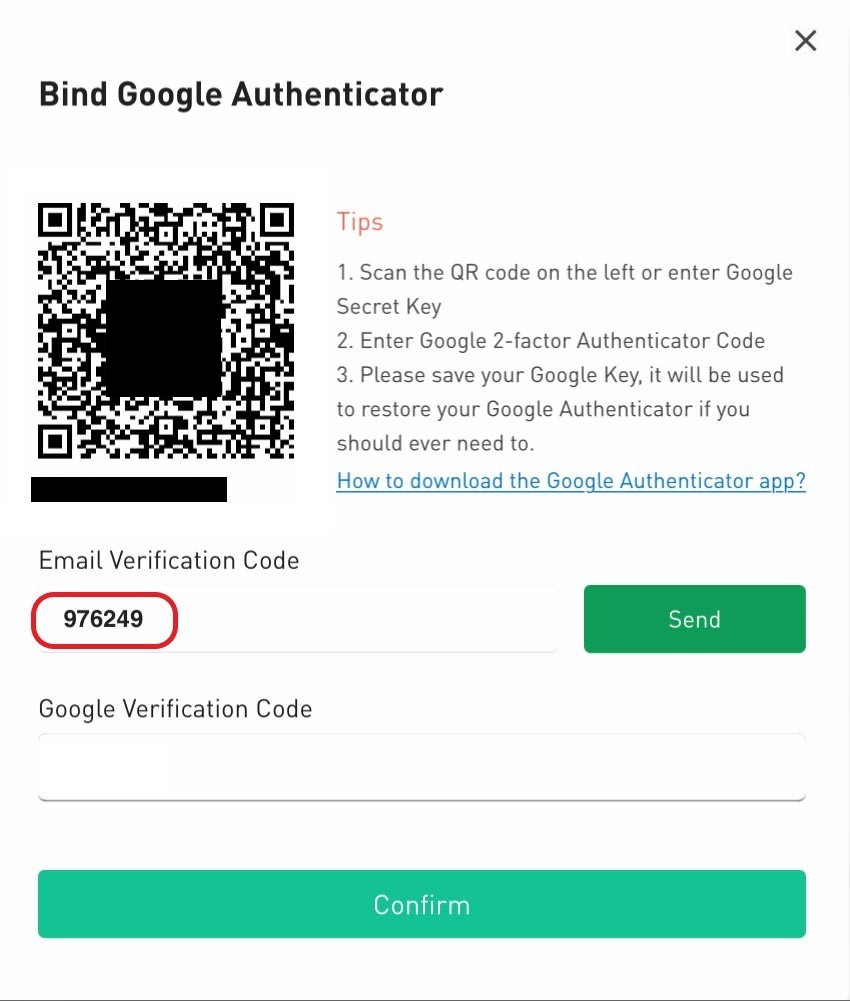
vi) Open the Google Authenticator App and click +. You must have Google Authenticator installed on your mobile phone in order to complete this step.
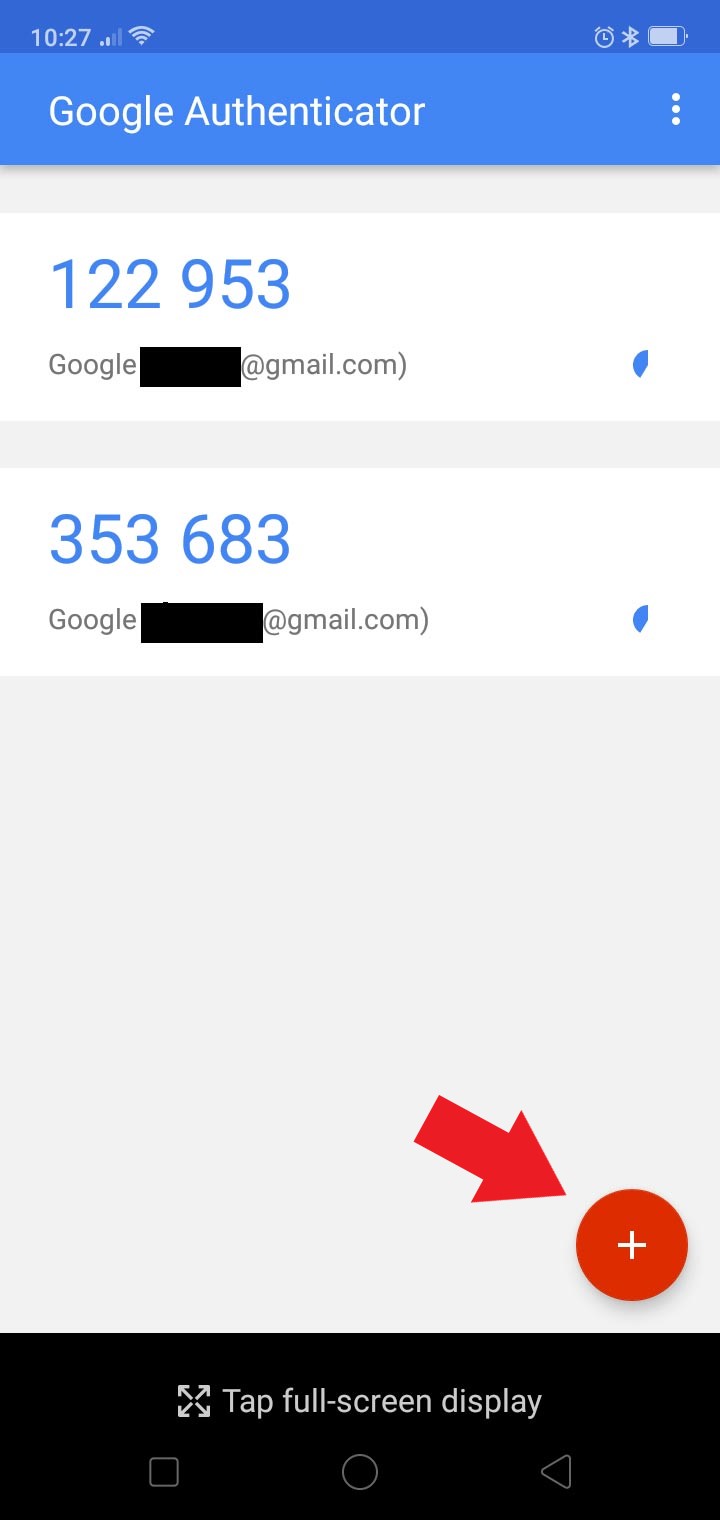
vii) Scan the QR code. A new line item Bitforex (This email address is being protected from spambots. You need JavaScript enabled to view it.) will appear.
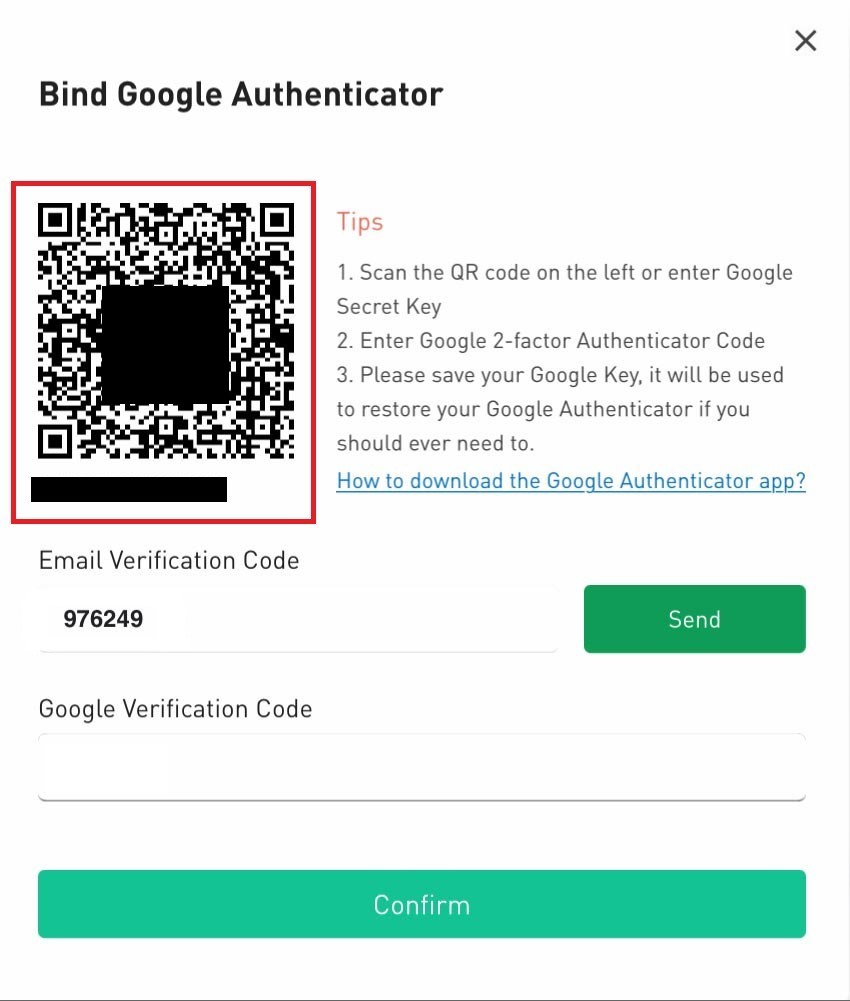
viii) Enter the Google Verification Code from the Google Authenticator Bitforex code and select Confirm
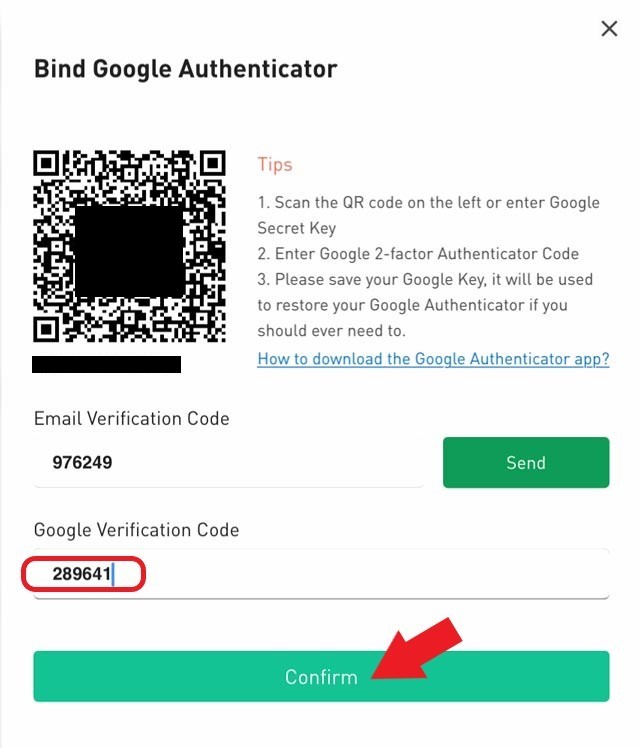
ix) Once complete, the Google Authenticator will have a Checkmark
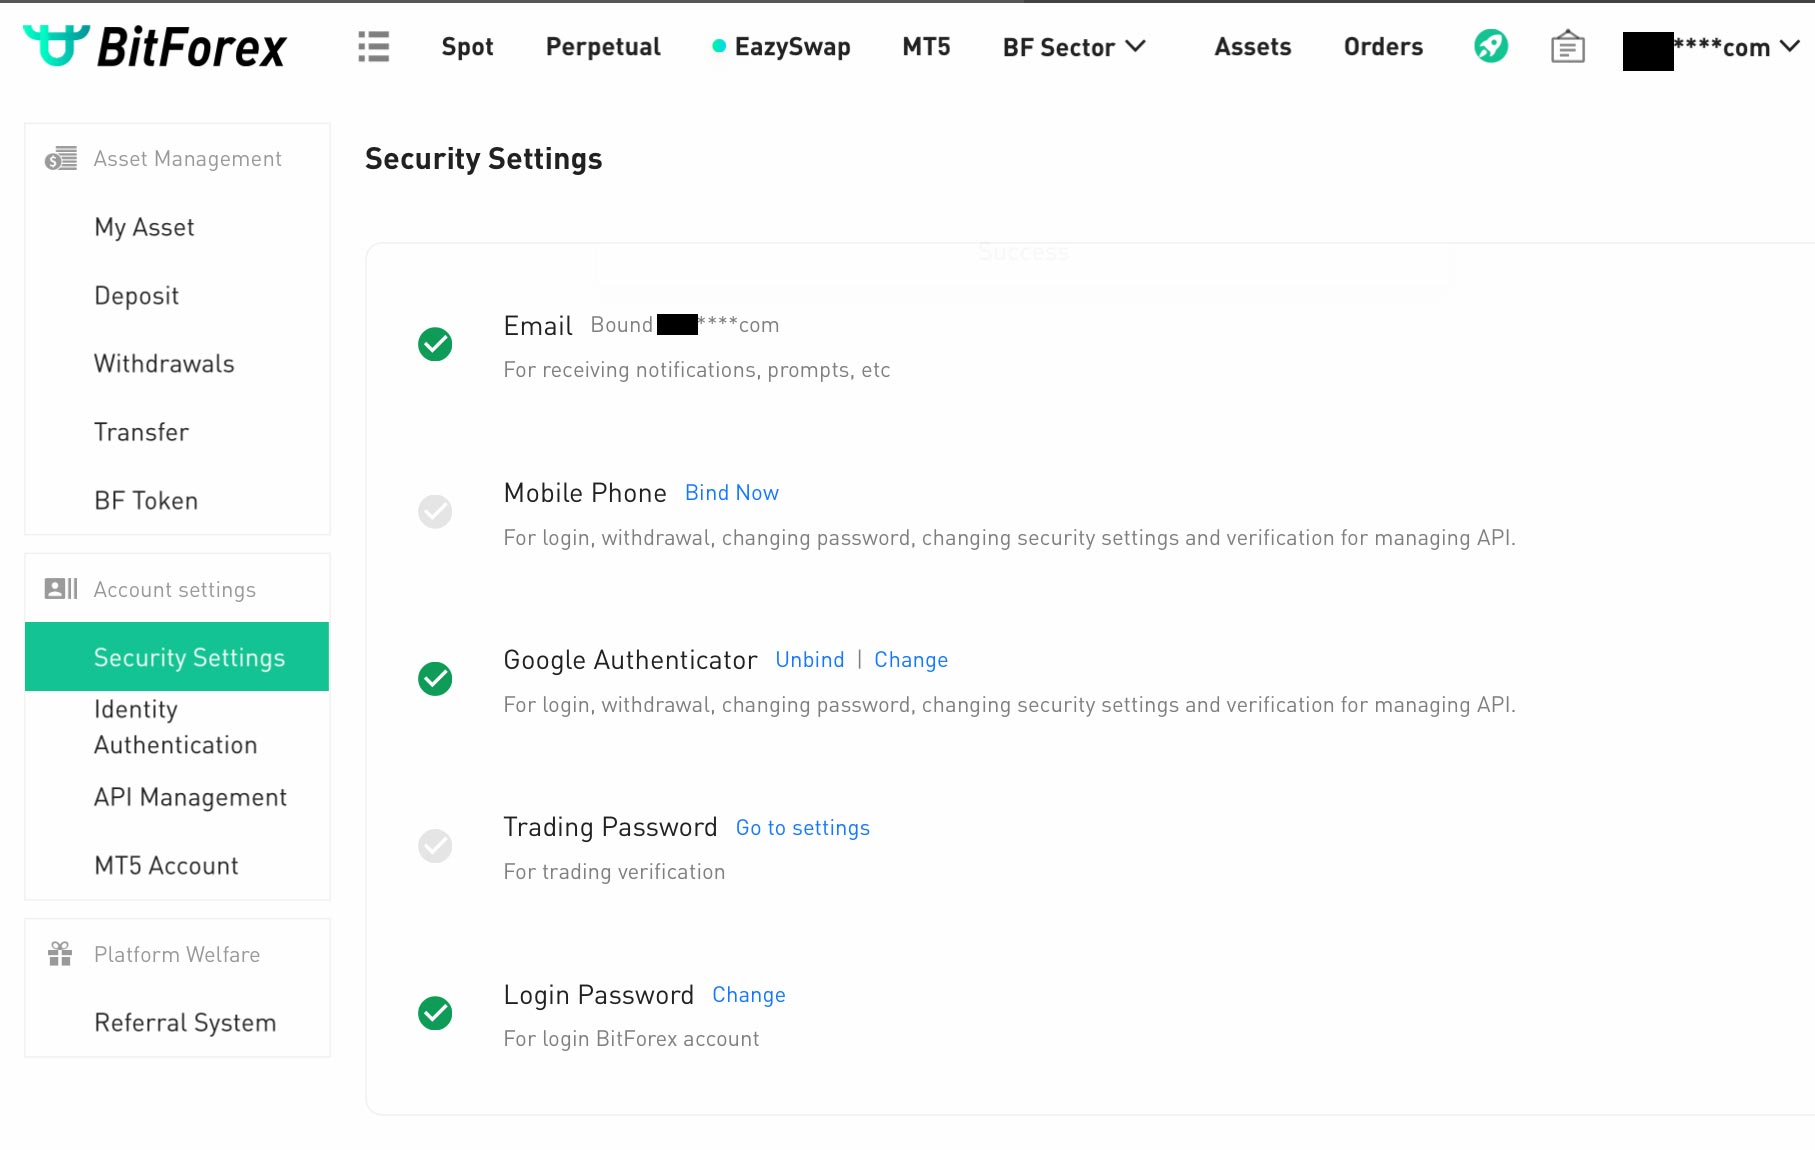
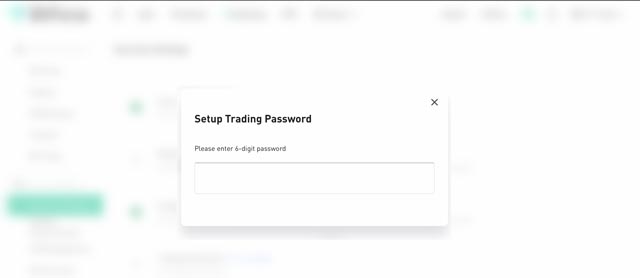
c) Set up Trading Password (This is mandatory for all future trades)
i) Click on Go to settings under Trading Password
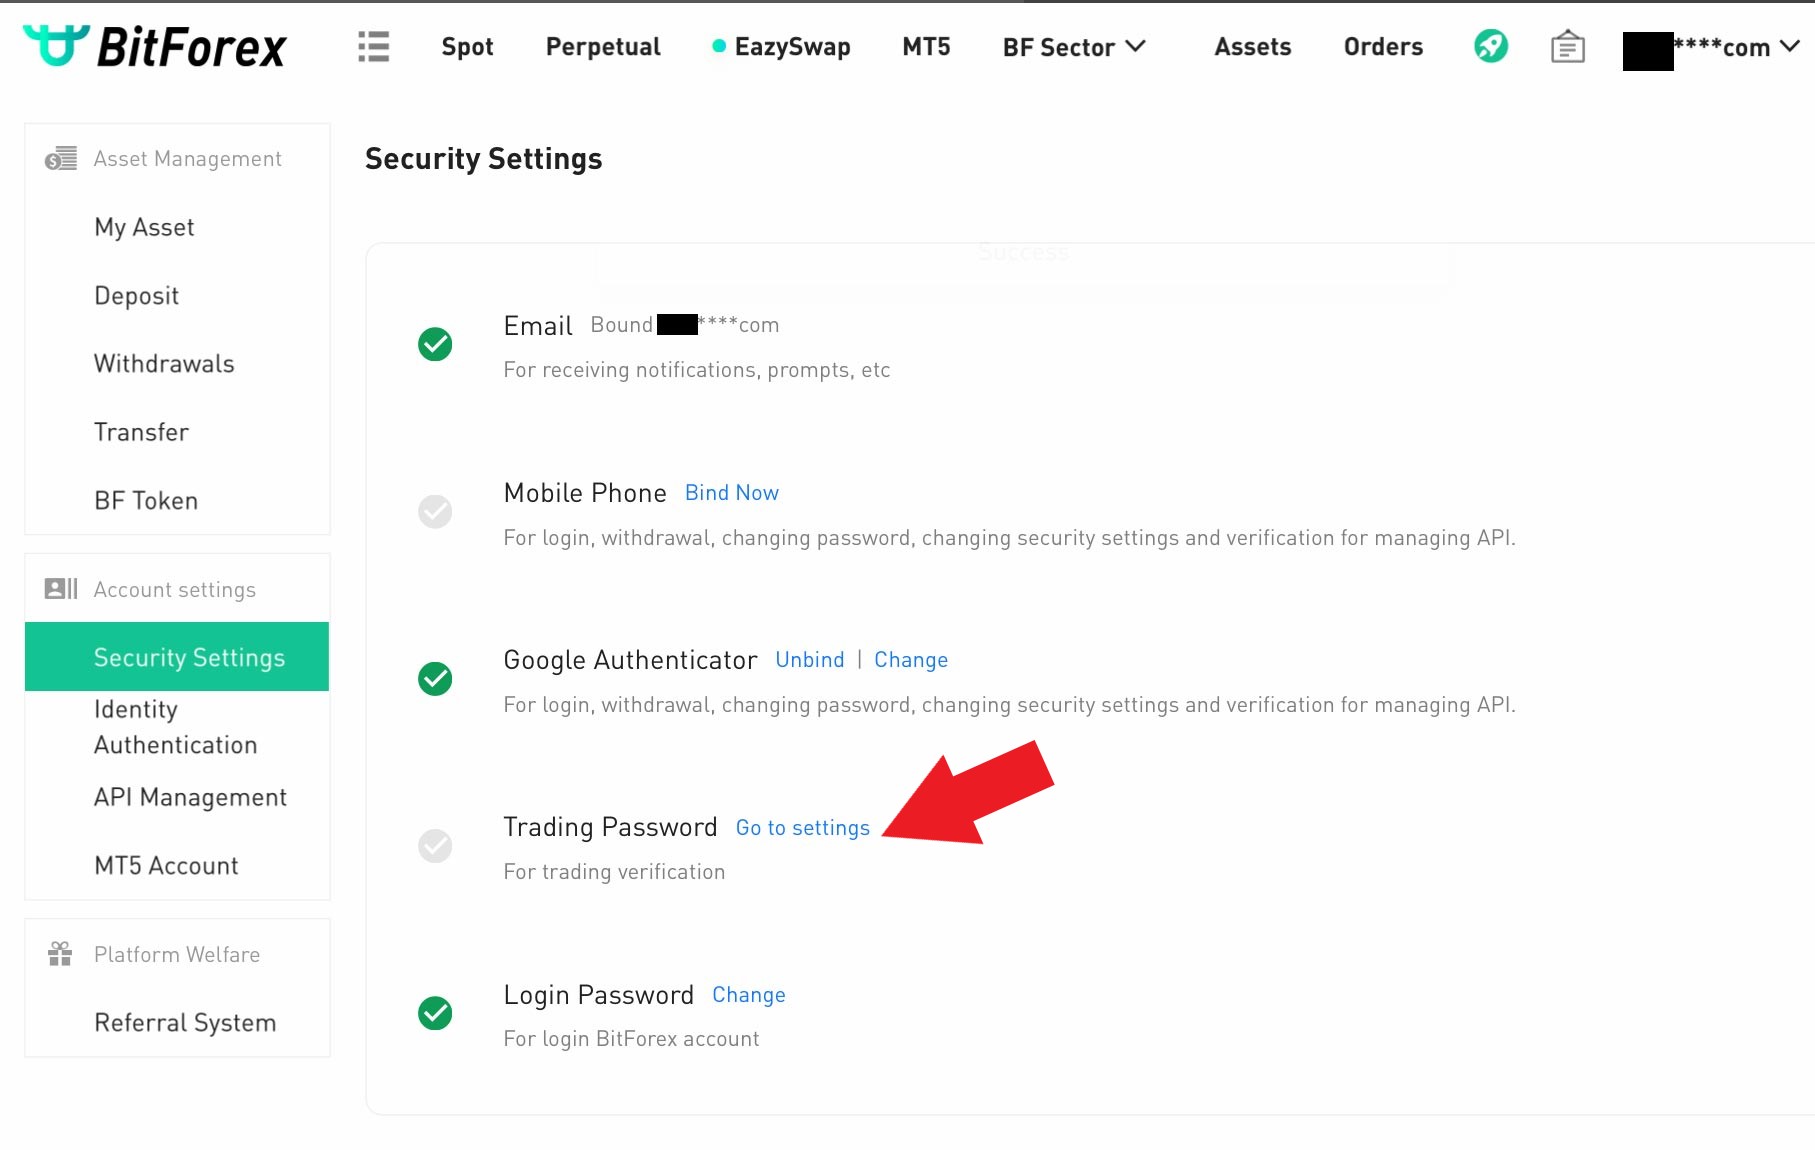
ii) Enter a 6-digit password
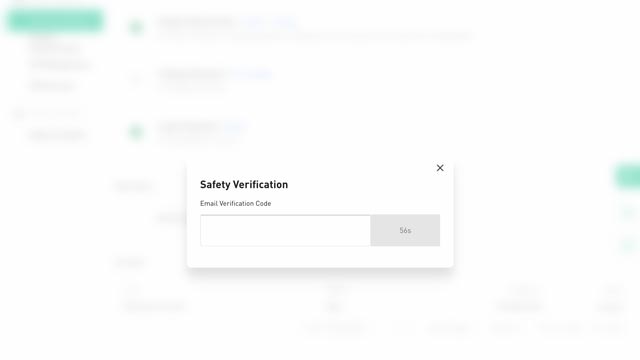
iii) Go to your email for the verification code and enter the Verification Code
iv) Open the Google Authenticator App and enter the Google Verification Code
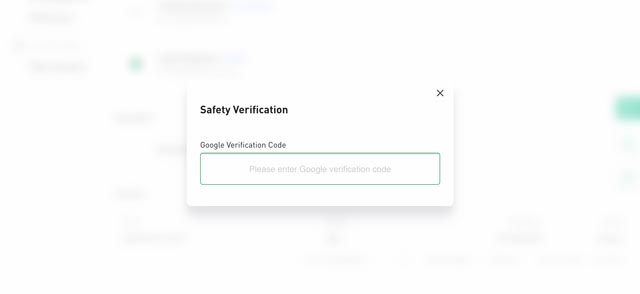
v) Once complete, the Trading Password will be checked
Step 4 - Register BitForex.com Wallet in Crypto.com Wallet
a) Open Crypto.com app and click on Transfer
![]()
b) Click on Withdraw
![]()
c) Click on Crypto
d) Click on External Wallet
e) Select Add Wallet Address
f) Select Ethereum (Note this example is based on Ethereum)
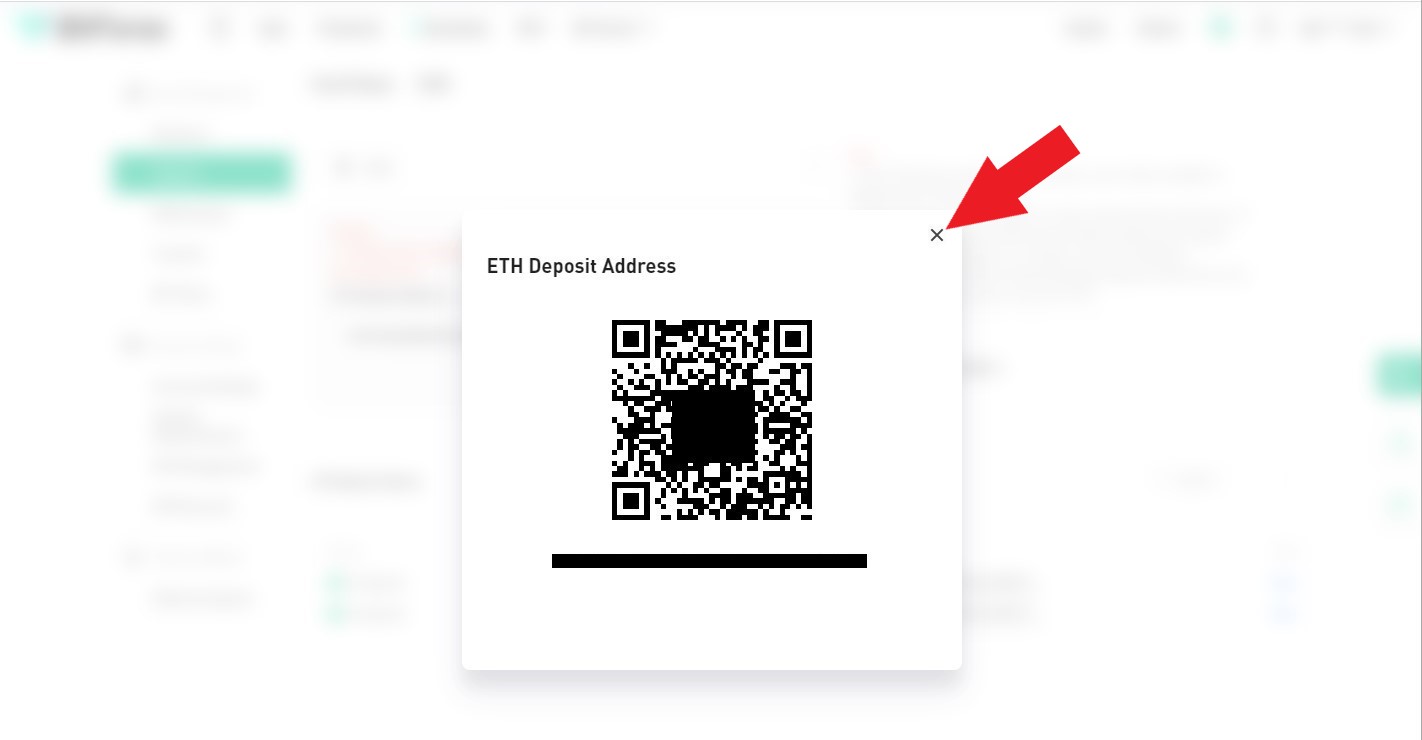
g) Open Bitforex and click on Deposit under Ethereum.
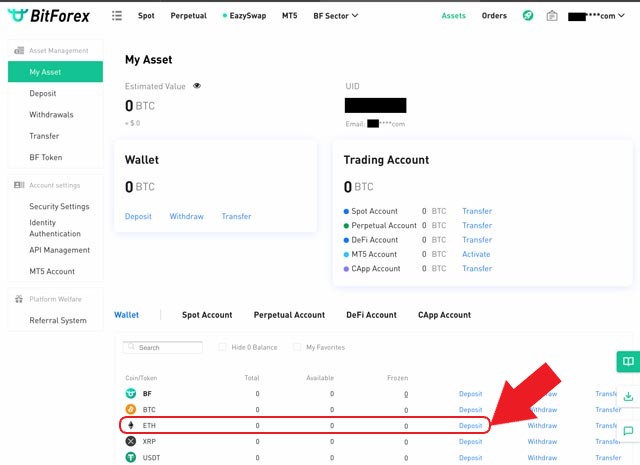
h) Click on QR Code
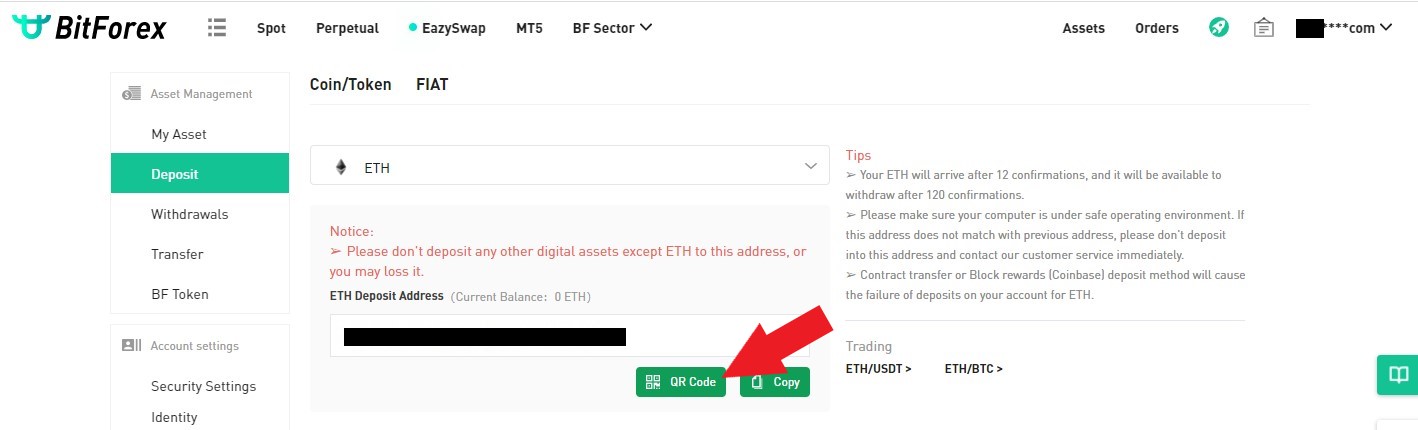
i) This will open the QR code for you to scan into your Crypto.com app
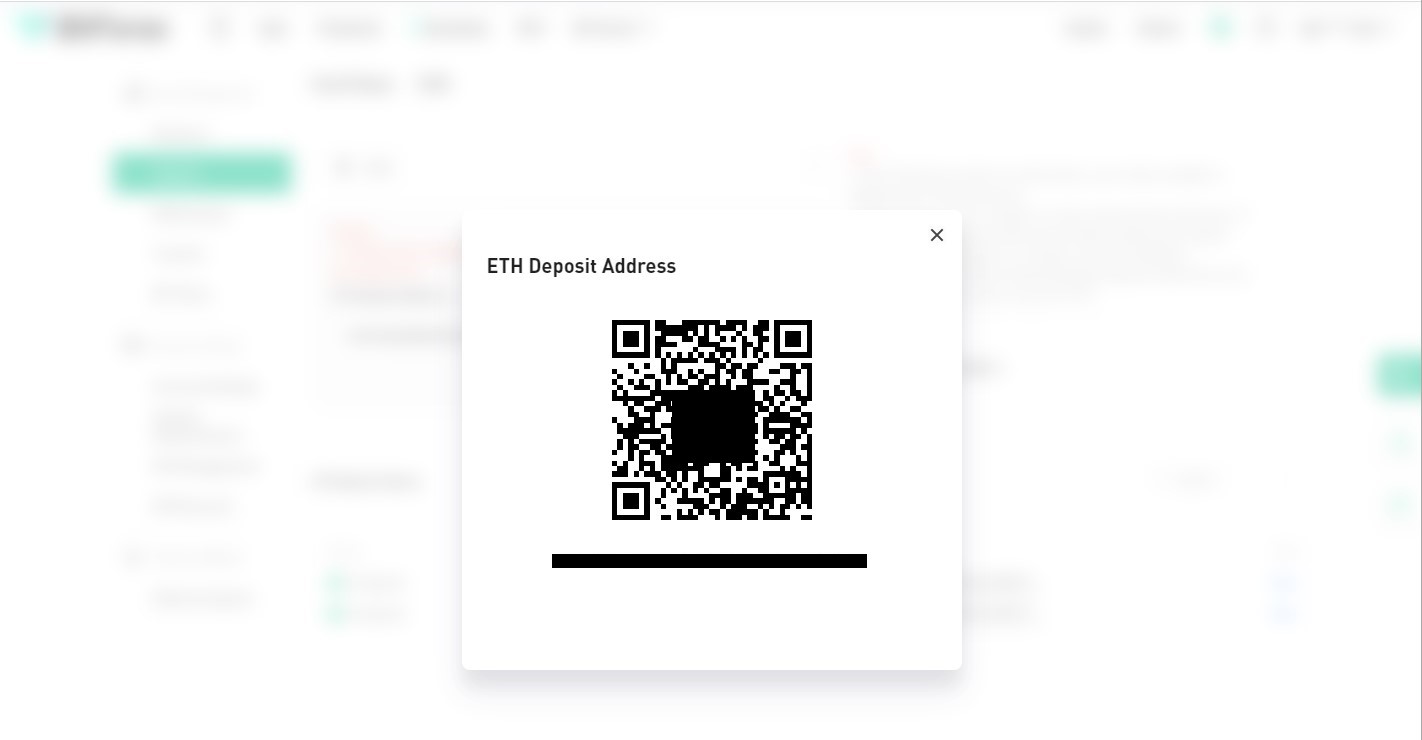
j) On your Crypto.com app select the QR code symbol
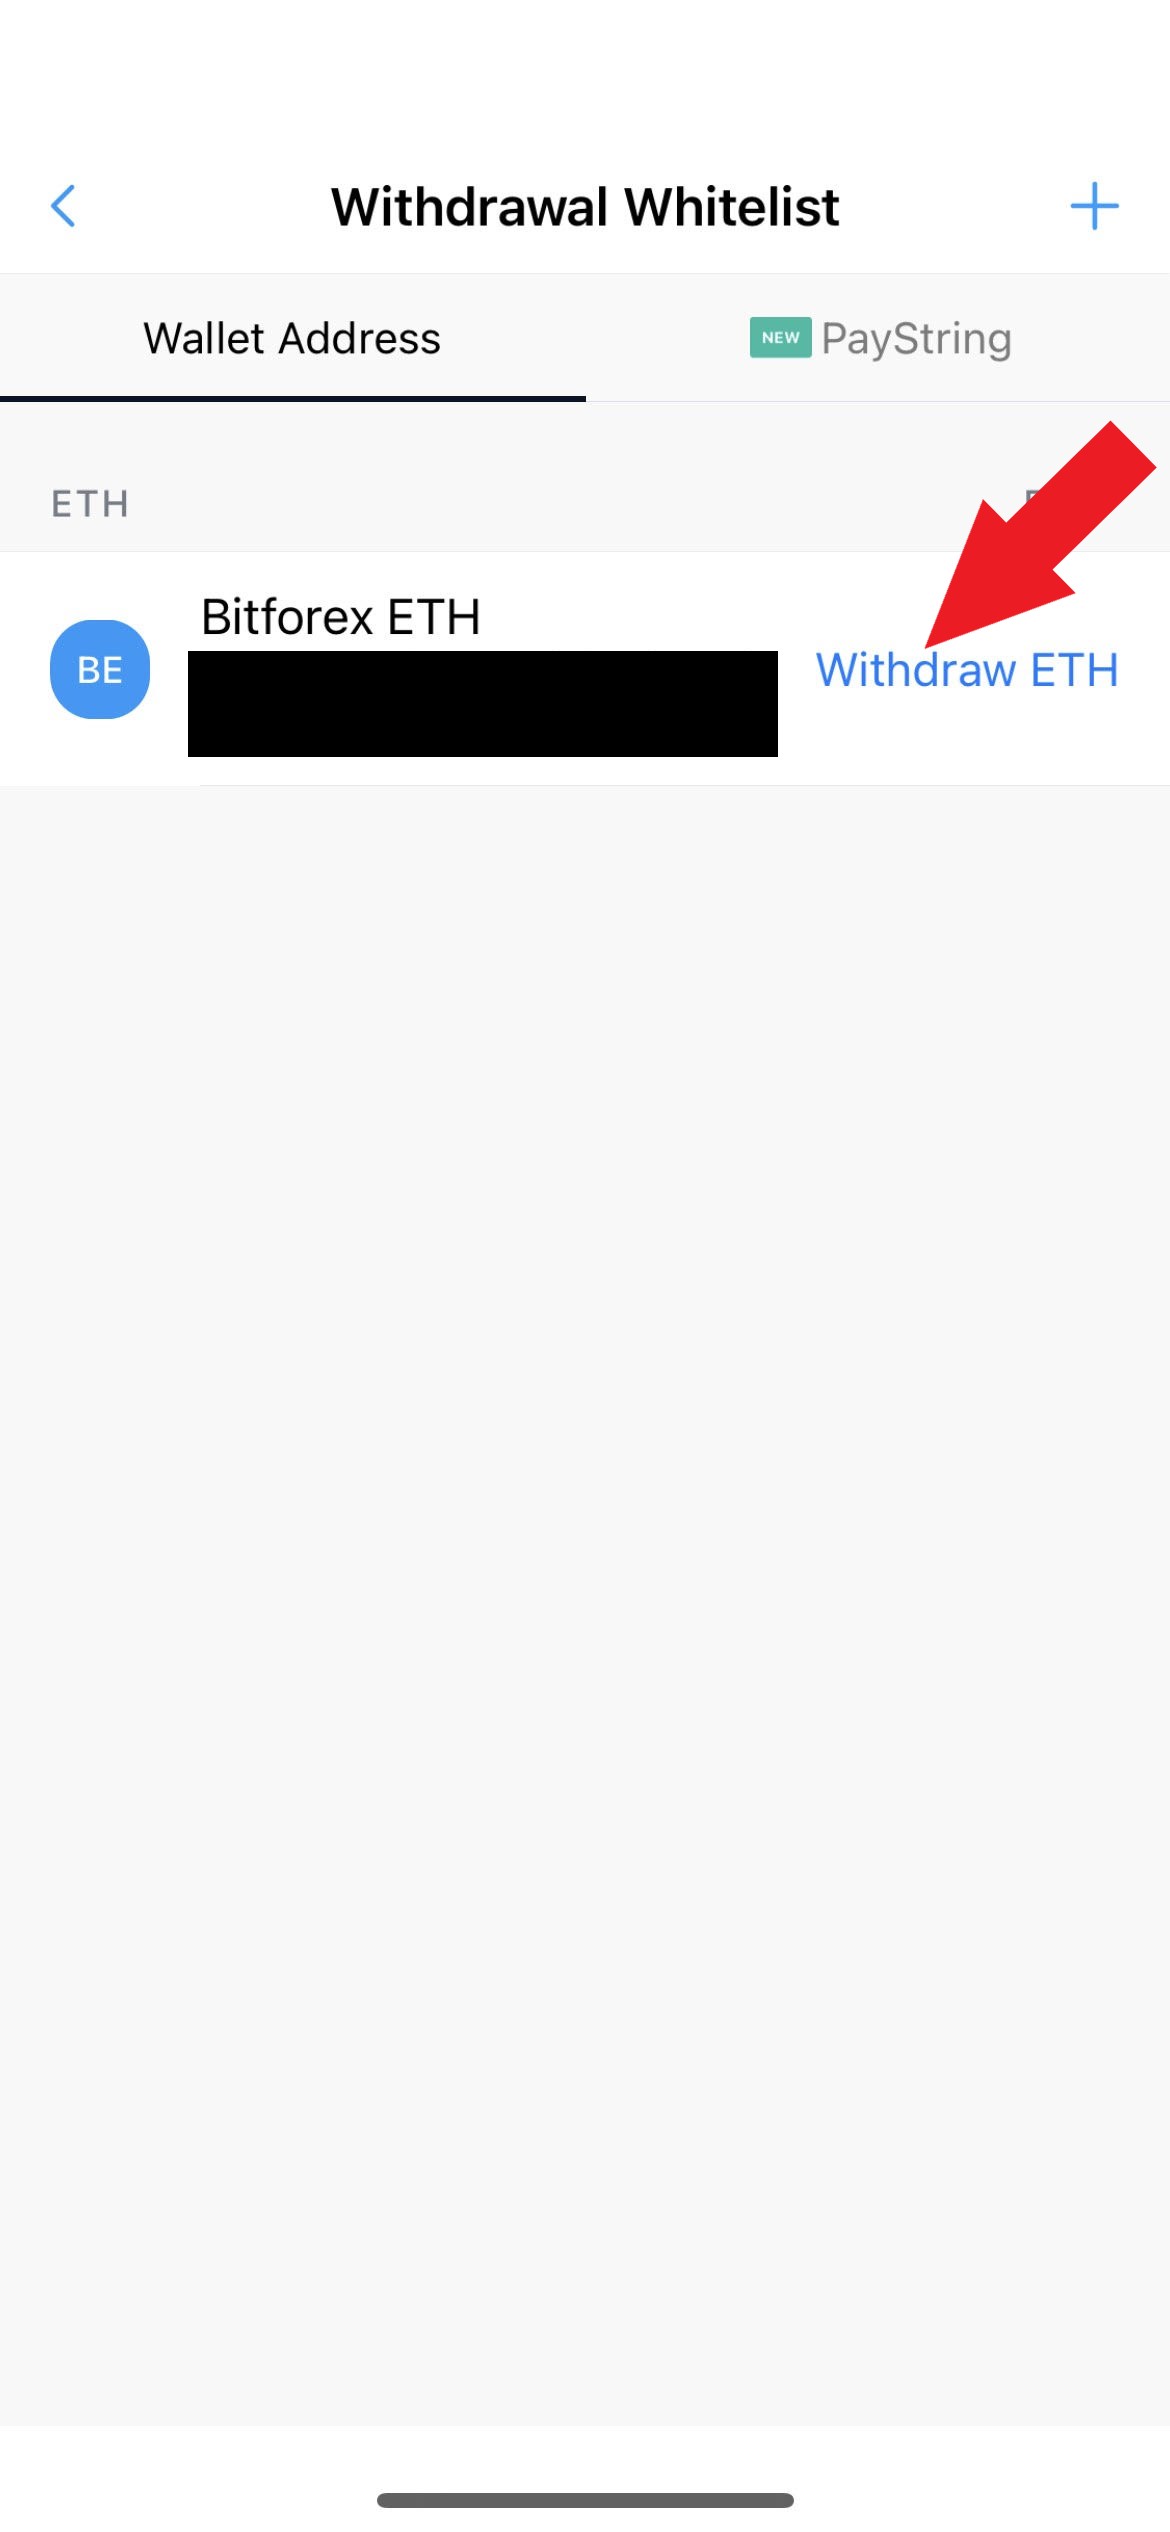
k) Scan the BitForex QR code image and the Ethereum Address will populate on your phone. Input WALLET NAME Bitforex ETH and select Continue.
l) The Check your email to confirm your new wallet address screen will appear. Select Open Email.
m) Open your email from your mobile phone and select Confirm Withdrawal Address
n) The address will appear in your Withdrawal Whitelist (keep this open for Step 5)
Step 5 - Transfer Ethereum from Crypto.com Wallet to BitForex Wallet
a) Click on Withdraw ETH
b) Select how much ETH in US dollars to transfer, enter notes in Send Note (Optional) and click Withdraw

c) Enter Passcode
d) Tap Anywhere to close the Your ETH withdrawal request has been submitted screen
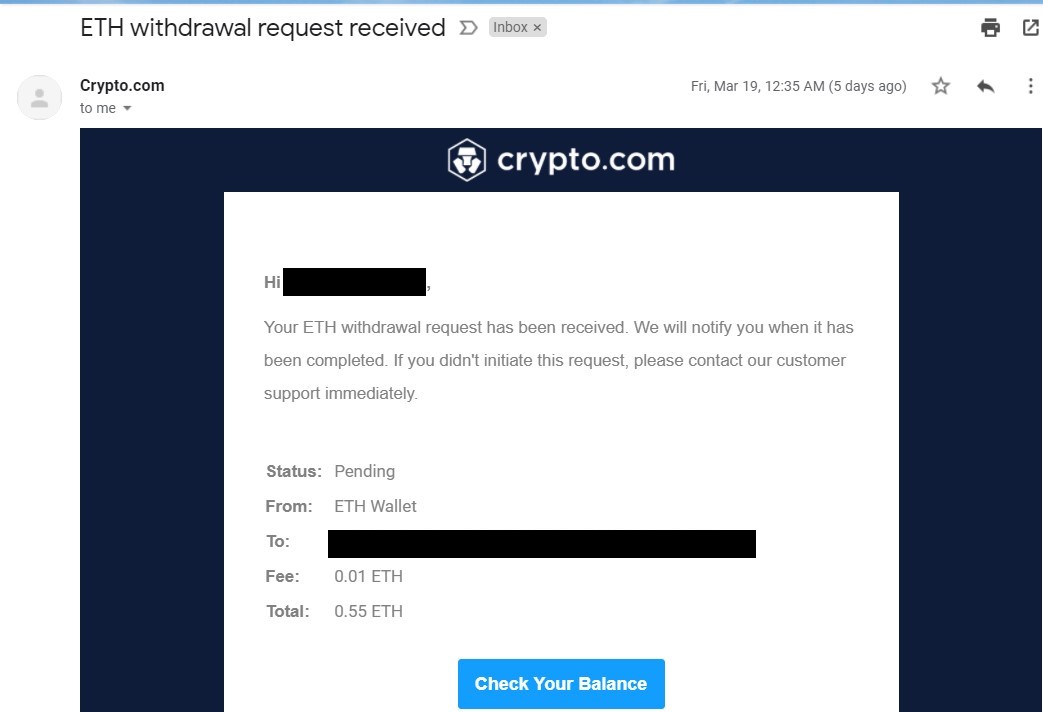
e) You will receive an email notification also confirming the withdrawal request has been received. The transaction will take up to 2+ hours (depending on the time of day)
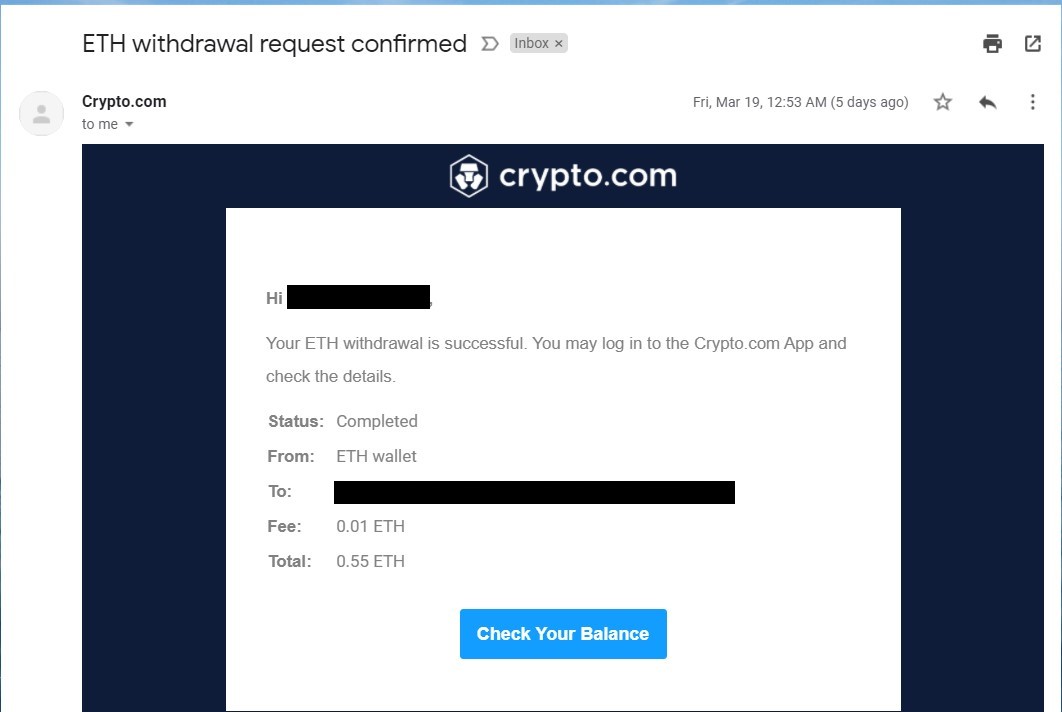
f) Once the withdrawal is complete, you will receive an email notification
Step 6- Transfer ETH from BitForex Wallet to Spot Account
a) On Bitforex, click X to close the QR code window
b) Click on Transfer
![]()
c) Select ETH under Coin/Token, Spot Account, Transfer All, and Continue

Step 7 - Convert Cryptocurrency to USDT (Tether)
a) Sell ETH (Ethereum) for USDT (Tether)
Step 8- Buy OMI (Congratulations on getting this far, you're almost there)
a) Buy OMI Token with USDT (Tether)
References
- What is ECOMI (OMI)? Retrieved 16 March 2021.
- Ecomi (OMI) Token Sale Has Come to a Successful Close. Retrieved 16 March 2021.
How to Create a BitForex Wallet and Trading Account
Written by Administrator
This article provides a guide to creating a BitForex.com  Wallet and a Spot Trading Account. This guide is for devices compatible with Windows 10 and newer, and MacOS 10.11 and higher.
Background
Bitforex provides spot crypto trading, perpetual Bitcoin contract trading, EasySwap (semi-decentralized matching Protocols) trading, and MT5 (Forex, commodities, metals, and crypto futures) trading.
Since BitForex does not state that US investors cannot register with them, we believe that US investors can register and trade on this exchange. However, all US investors should form their own opinion on whether State rules or Federal rules affect their foreign trading activities or not prior to registration/trading on this exchange.
Contents
Register for a BitForex Wallet and Spot Trading Account
Register an Account with the Bitforex Exchange
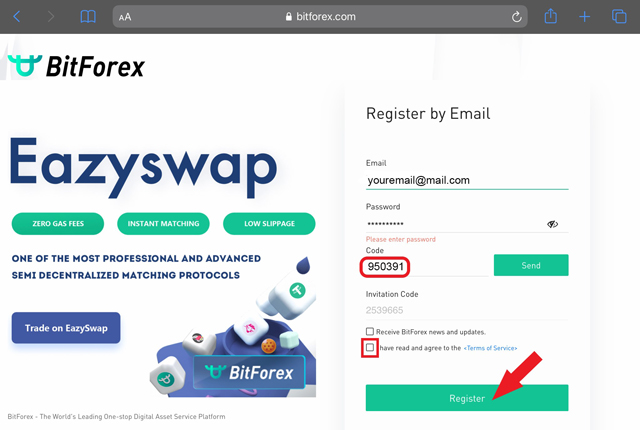
1) Go to the link BitForex.com
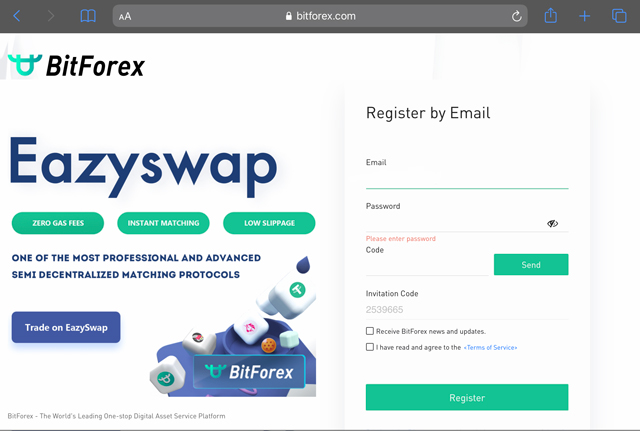
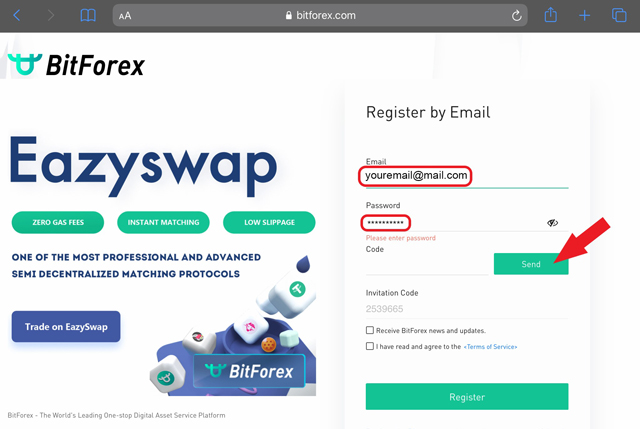
2) Input your email address, the desired password, and click Send
3) Go to your email and get the verification code
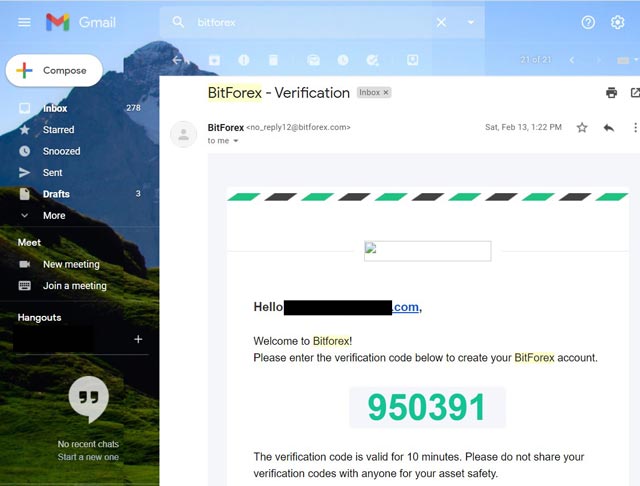
4) Input the verification code, check the box "I have read and agree to the <Terms of Service>", and click Register
5) If registration is successful, the following screen will appear. Click on Assets
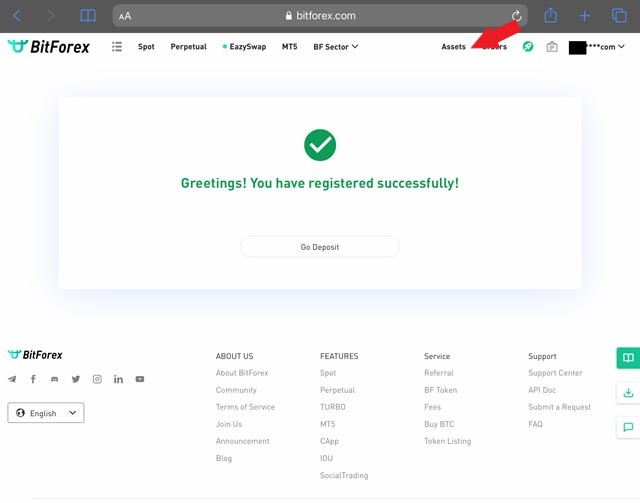
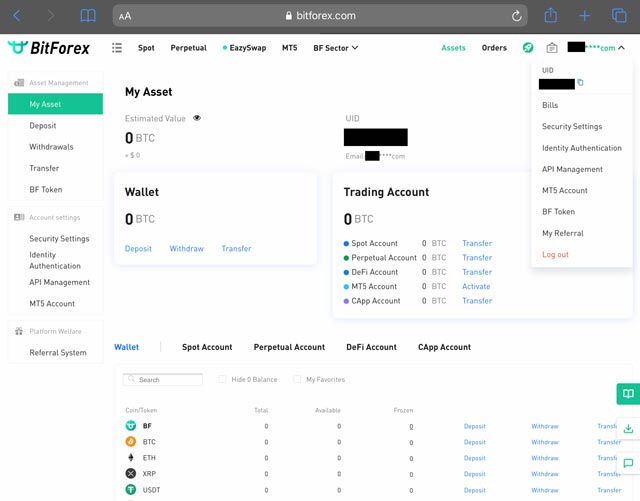
6) Congratulations, you have successfully created a BitForex Wallet. The My Asset screen defaults to the Wallet account. The Spot Account is your separate trading account.
References
- Trade At BitForex Invest in the Future Retrieved 20 March 2021.
Crypto.com's mission is "to accelerate the world's transition to cryptocurrency," and is currently available in 49 states of the United States of America and US Territories [1]. This is great for people in states where cryptocurrency is unavailable such as Rhode Island, Arizona, and Hawaii (sorry New York), and is currently one of a few crypto-app wallets that are available for those states.
Please note this process will take a while and once done, requires Crypto.com time to process your identification. I've seen it go through in less than 5 minutes and upwards of a month.
This article provides a guide to set up and secure your Crypto.com wallet. This page is for both Android and Apple-based mobile phones. The Crypto.com wallet is compatible with Android OS and Apple iOS.
Contents
Step 1 - Install the Crypto.com Application to Your Mobile Phone
Step 2 - Sign Up with Crypto.com
Step 3 - Complete KYC
Step 4 - Set Up Crypto.com App Security, Default Currency, and Accept Terms & Conditions
Step 5 -Fund Your Account
Step 1 - Install the Crypto.com Application to Your Mobile Phone
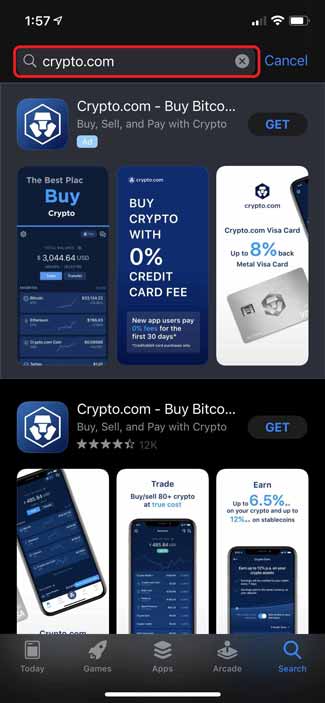
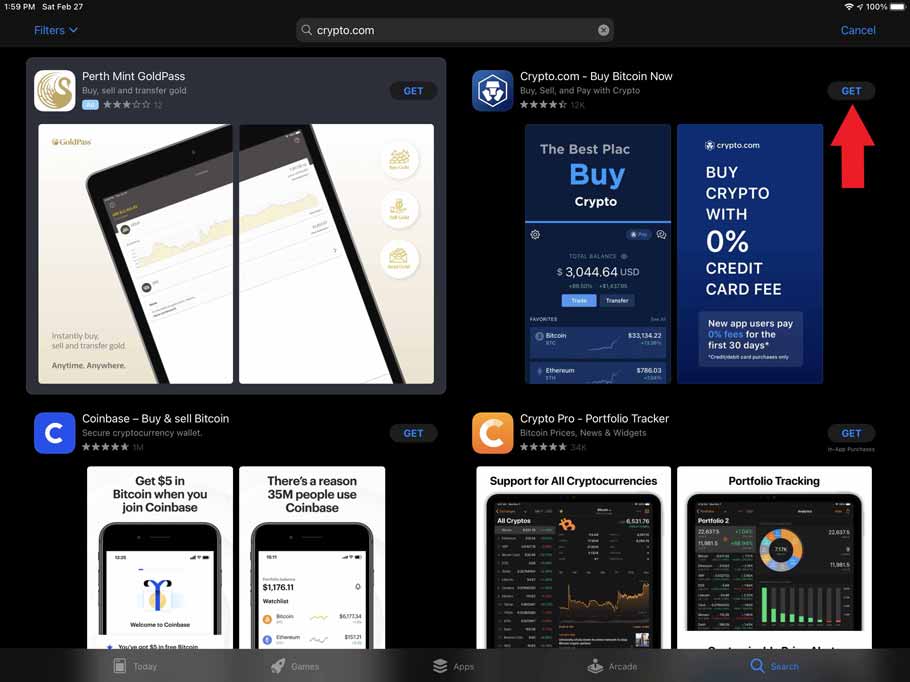
a) Go to the Google Play Store or Apple App Store and search under Crypto.com
b) Select Get
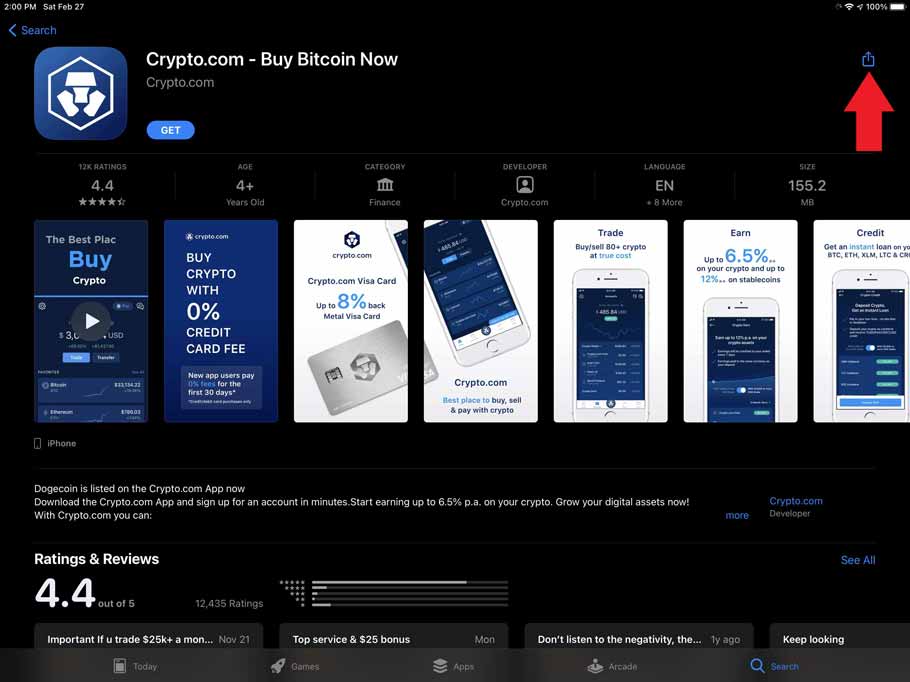
c) Select the download icon
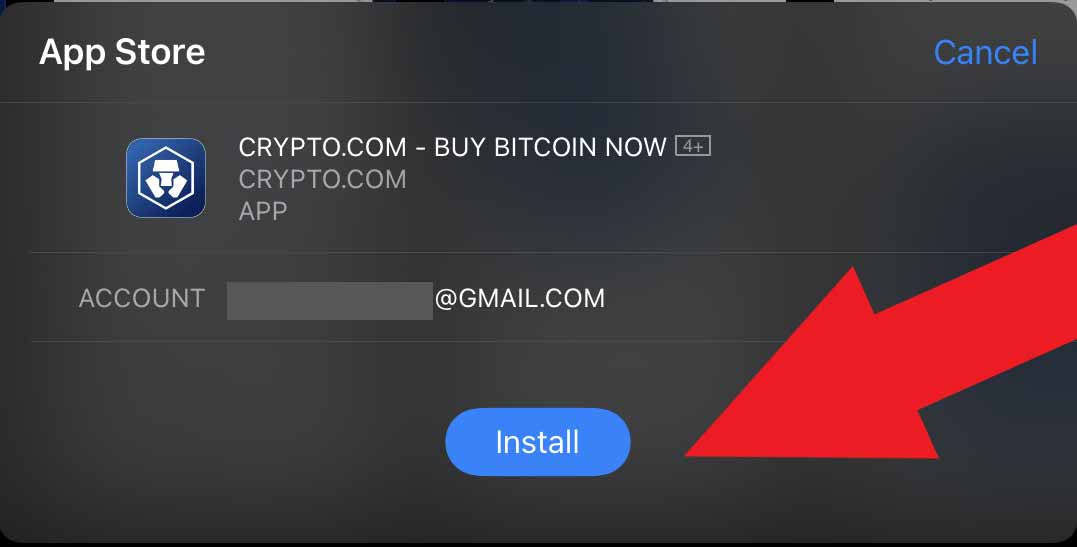
d) Select Install
Step 2 - Sign Up with Crypto.com
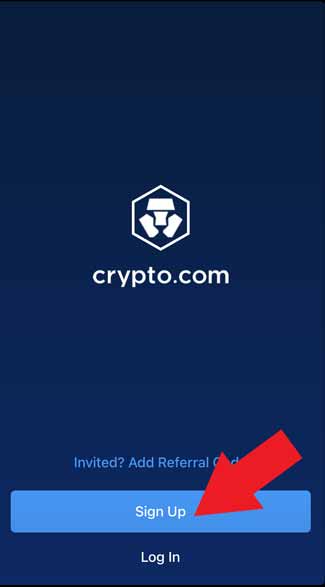
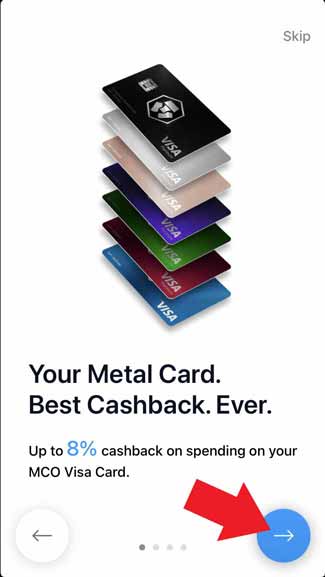
a) Open the App and select Sign Up
b) Click through information about Crypto.com
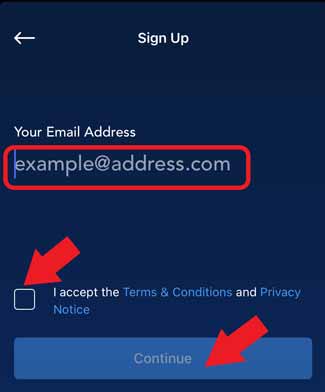
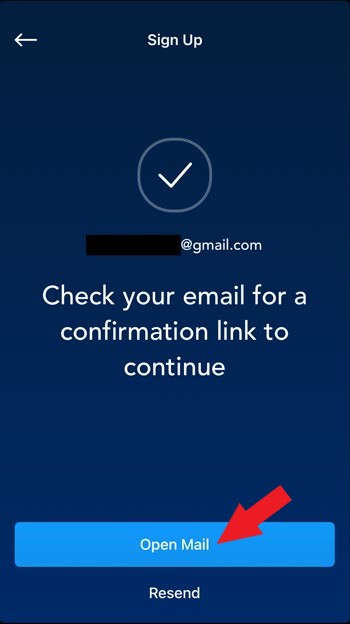
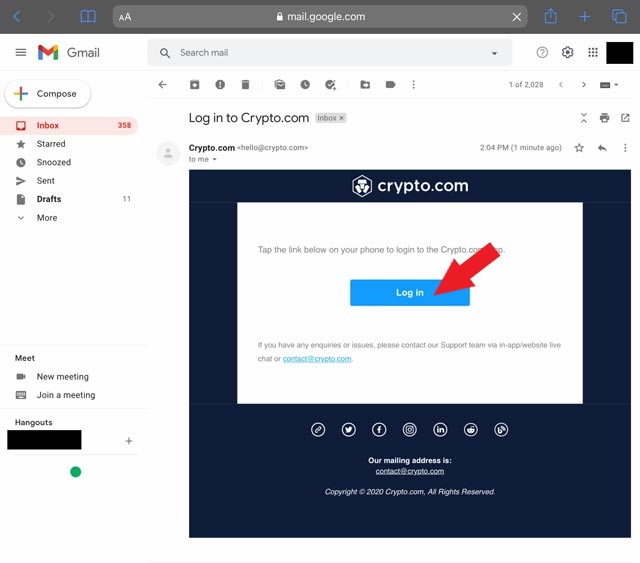
c) Verify Email Address
i) Enter your email address, select the check box to accept the Terms & Conditions, and select Continue
ii) Select Open Mail to view email verification
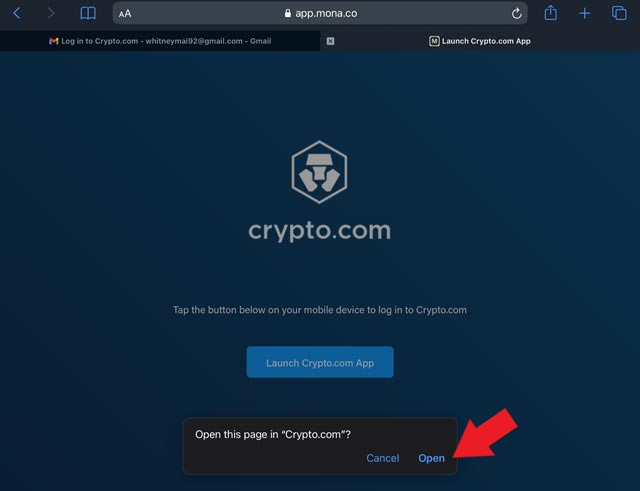
iii) Click on Log In to Reopen the Crypto.com App
iv) Select Open to Re-launch the Crypto.com mobile app
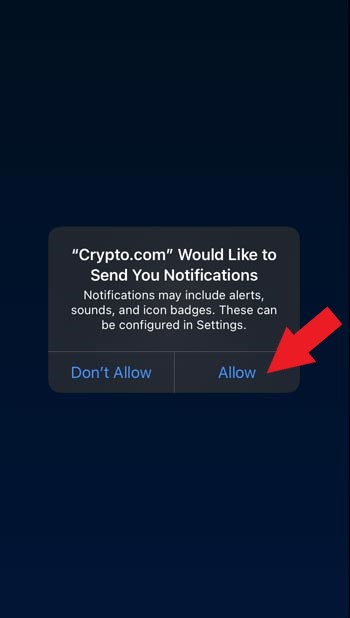
v) Select Allow for Crypto.com to send you notifications in the future. This may include future price alerts that you want to activate.
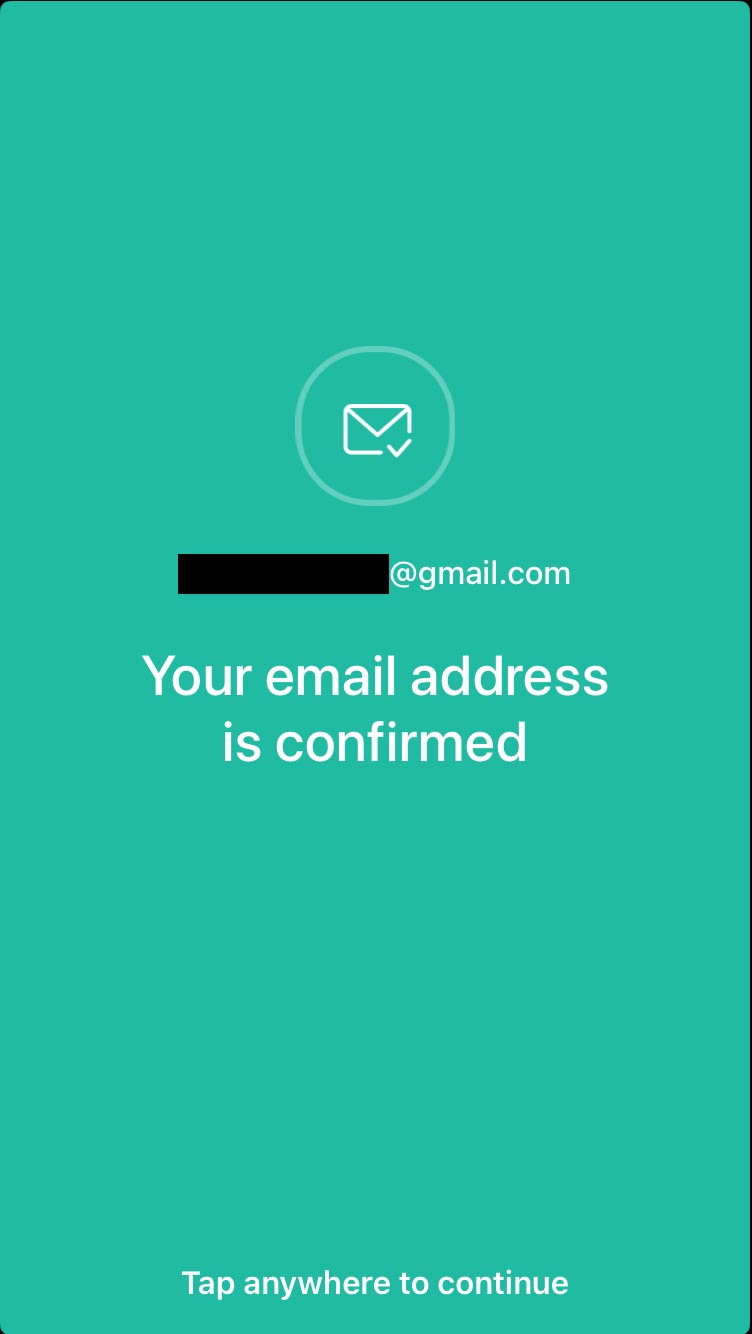
vi) Tap anywhere to acknowledge email address confirmation
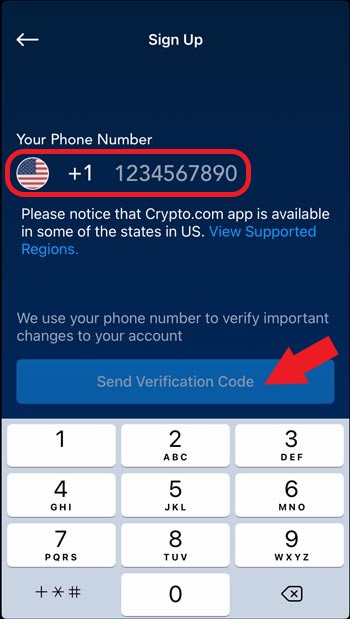
d) Verify Phone Number
i) Input your phone number and select Send Verification Code
ii) Enter the verification code that was sent to your mobile phone

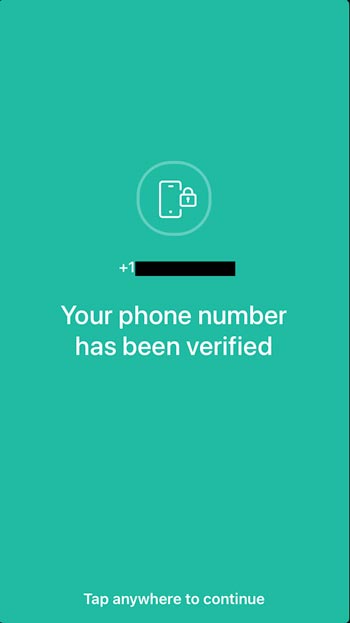
iii) Tap anywhere to acknowledge the phone number verification
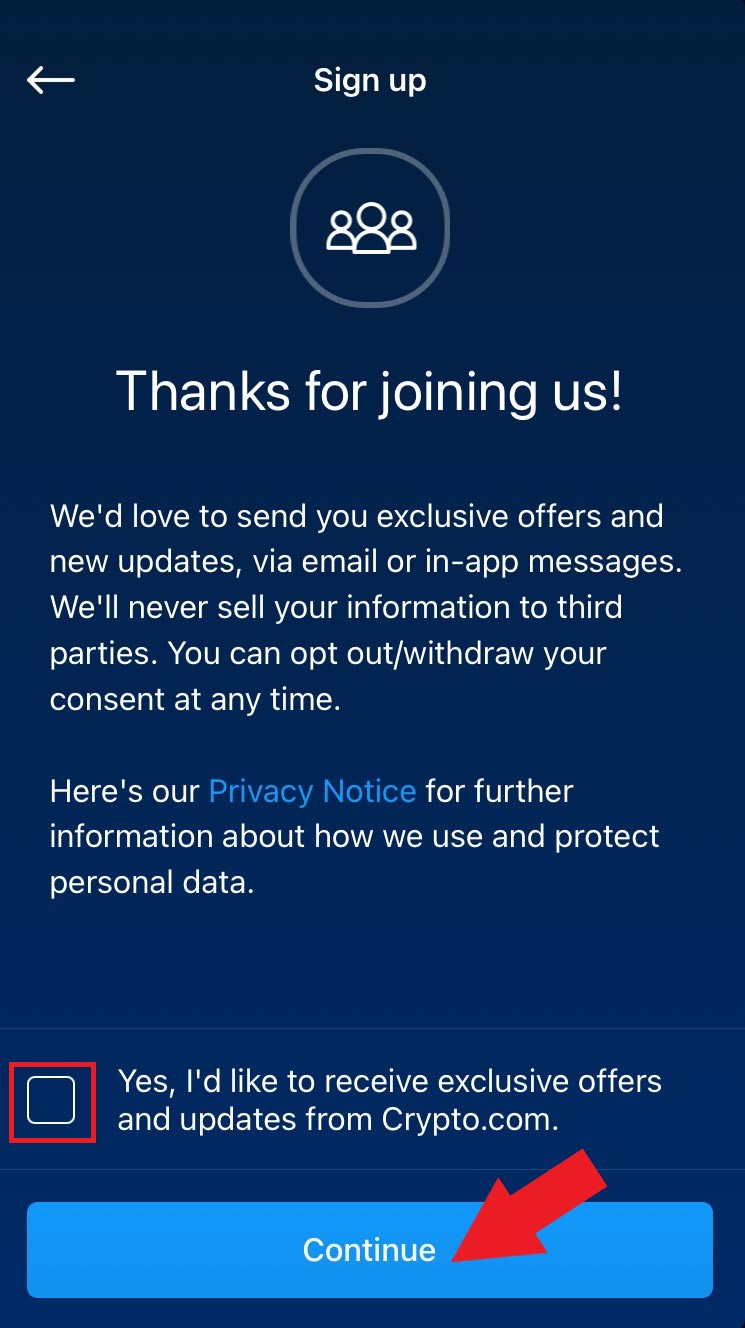
iv) If you want to get offers and updates from Crypto.com, select the check box. Select Continue.
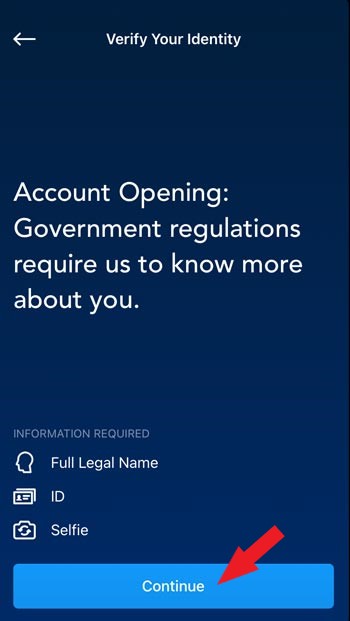
Step 3 - Provide government-regulated information
a) Click Continue
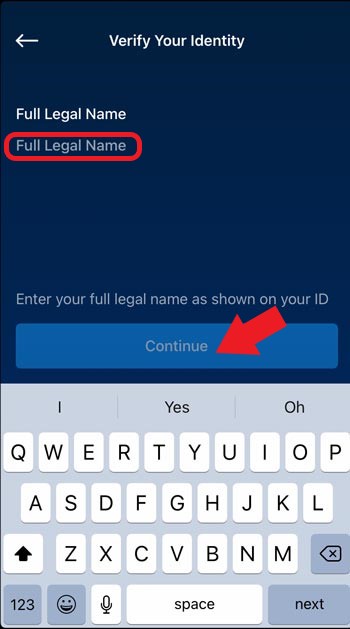
b) Enter your Full Legal Name (to match your ID) and select Continue
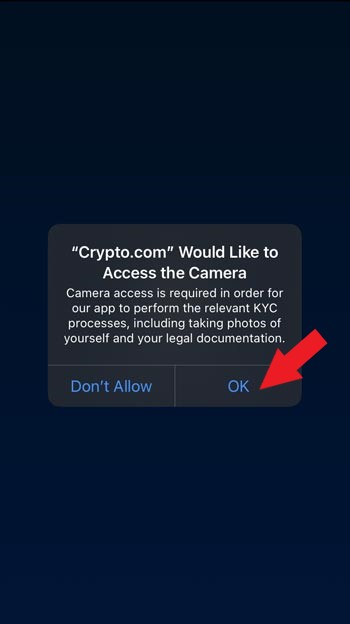
c) Select OK to permit mobile phone Camera access (used to take pictures of your ID and you)
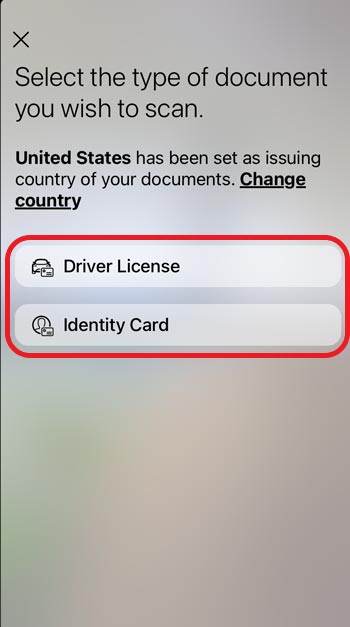
d) Select Drivers License or Identify Card
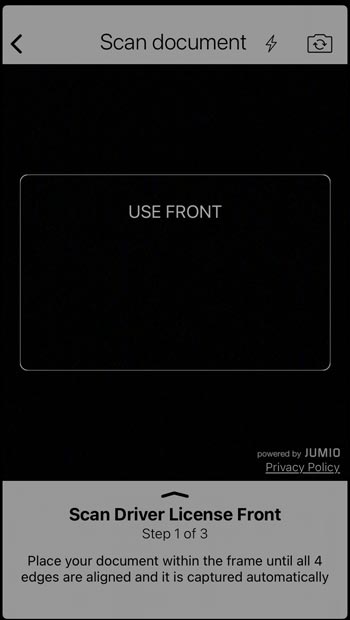
e) Scan the front of your ID (The example is for a driver's license). A photo will automatically be taken if all four corners are aligned in the screen.
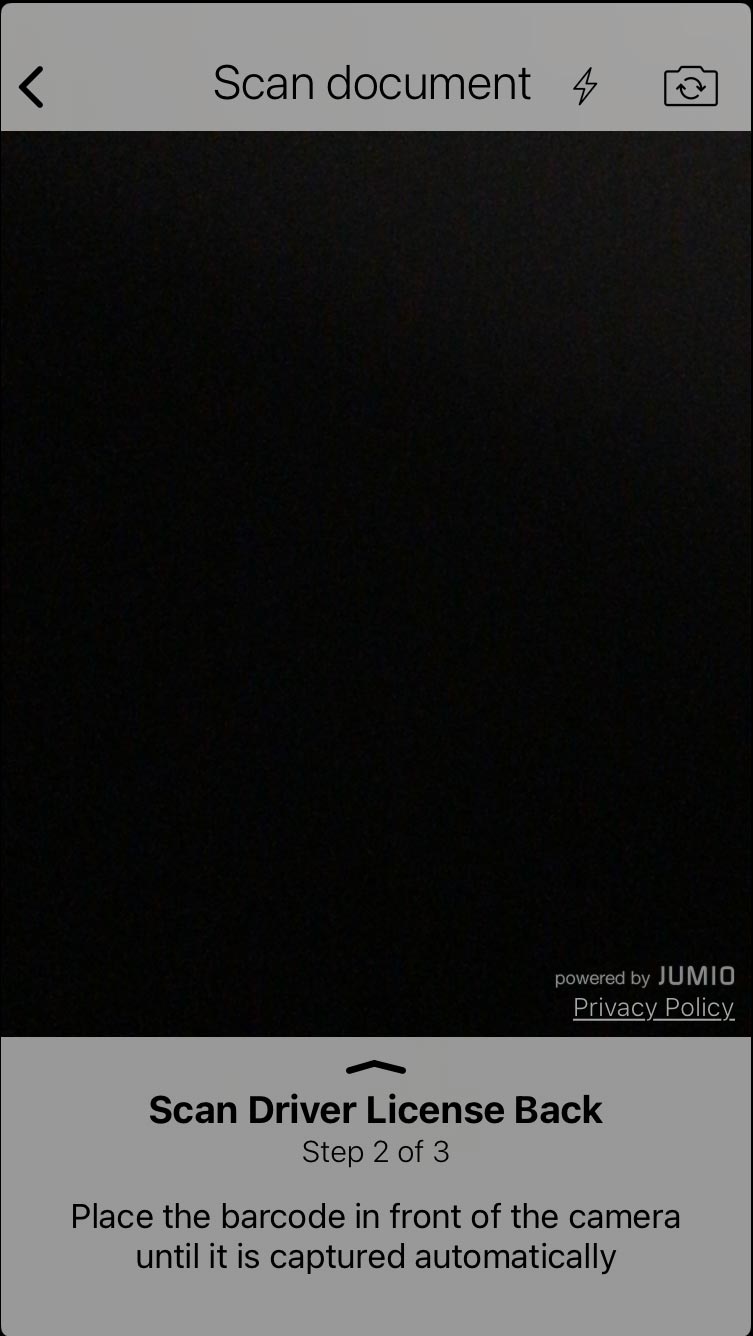
f) Scan the back of the ID
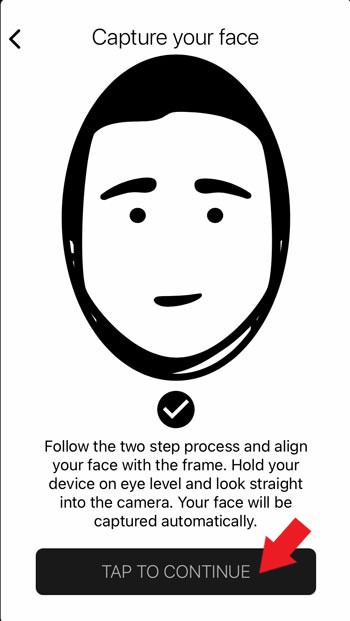
g) Scan your Face (follow the directions on the screen)

h) Once complete (a checkmark will appear), Tap to Continue
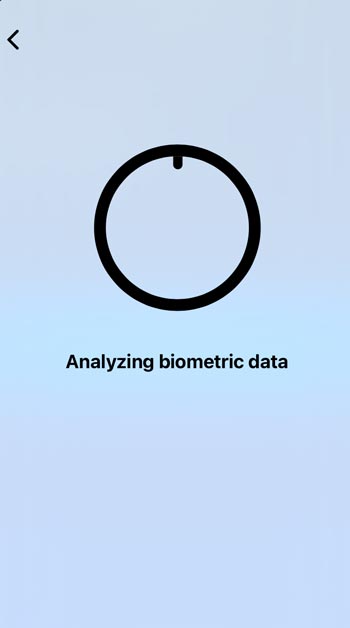
i) An Analyzing Biometric Data window will appear
j) A Uploading your documents screen will appear

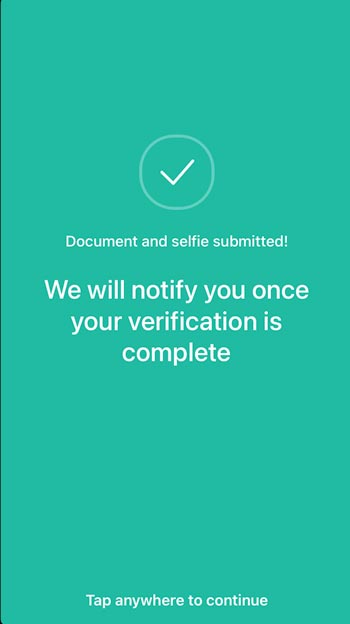
k) A Upload successful screen will appear

l) A We will notify you once your verification is complete will appear. Tap anywhere to go to the next screen.
m) Until you are approved, a Thank you! We will notify you once your verification is complete in 2-3 business days screen will appear every time you log into your Crypto.com app.

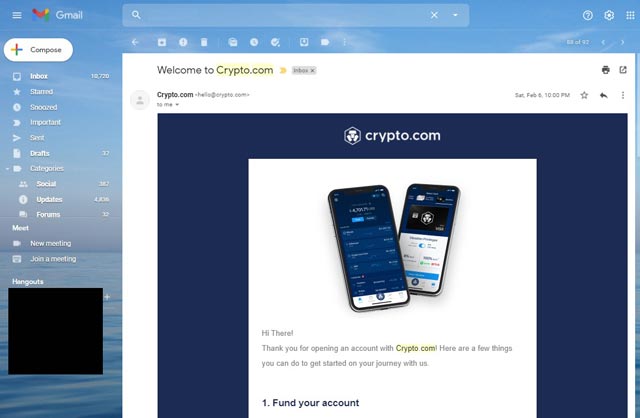
n) Once approved, you will receive the following Welcome to Crypto.com email
Step 4 - Set Up Crypto.com App Security, Default Currency, and Accept Terms & Conditions
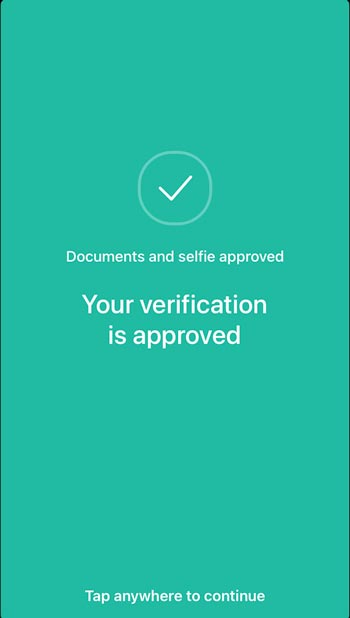
a) Go to the Crypto.com app and Tap anywhere to close the verification approved screen
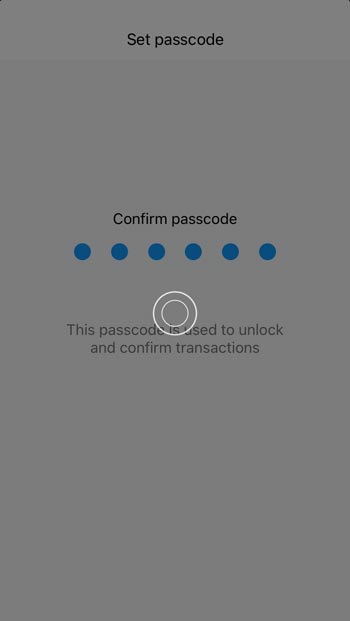
b) Set a 6-digit passcode. This passcode will be used to unlock the app and confirm transactions.

c) Confirm the passcode
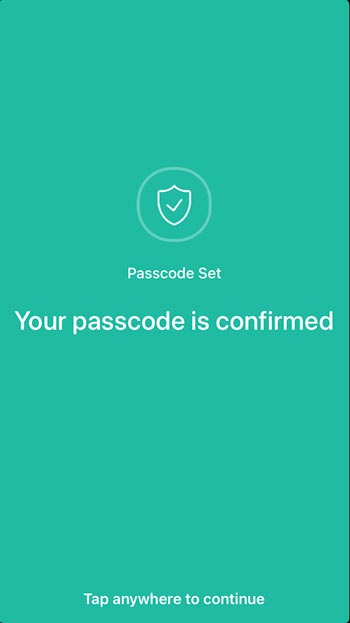
d) Your passcode is confirmed screen will appear
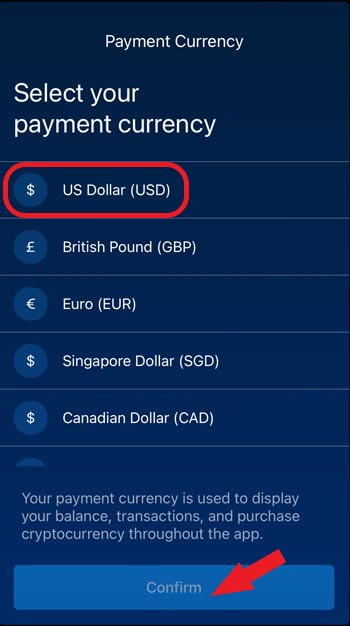
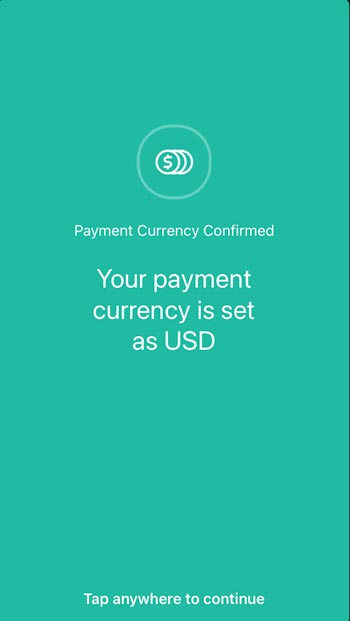
e) Select US Dollar (USD) payment currency and select Confirm
f) Tap anywhere to close the Payment currency confirmation screen
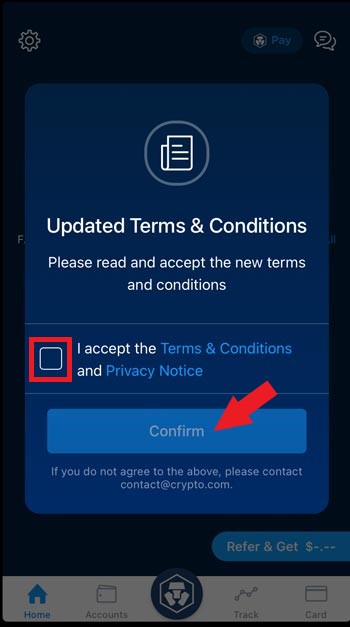
g) Select I accept the Terms & Conditions and Privacy Notice and select Confirm
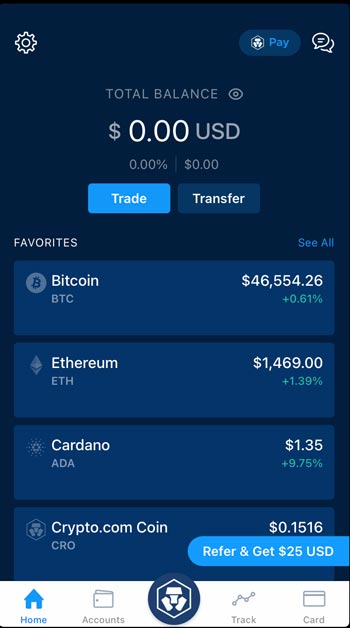
h) The home screen will open to the default Total Balance screen
Step 5 - Fund Your Account
a) Fund your Crypto.com account by
i) Buying cryptocurrency
ii) Transferring via ACH through your bank
References
- In Which U.S. States the Crypto.com is Available? Retrieved 16 March 2021.
- You are here:
-
Home

- Individuals